आउटलुक में संपर्क समूह (वितरण सूची) कैसे साझा करें?
मान लीजिए कि आप अपने संपर्क समूहों को अपने सहकर्मियों के साथ साझा करना चाहते हैं, तो आप उन्हें कैसे साझा कर सकते हैं? और क्या होगा अगर आप आउटलुक में आपको भेजे गए संपर्क समूहों को सहेज रहे हैं? यह आलेख आउटलुक में संपर्क समूहों को साझा करने के बारे में बात कर रहा है।
- आउटलुक में अपने संपर्क समूह (वितरण सूचियाँ) अन्य उपयोगकर्ताओं के साथ साझा करें
- आउटलुक में आपको भेजे गए संपर्क समूह (वितरण सूची) को साझा/सहेजें
आउटलुक में अपने संपर्क समूह (वितरण सूचियाँ) अन्य उपयोगकर्ताओं के साथ साझा करें
यदि आप आउटलुक में अपने संपर्क समूहों को दूसरों के साथ साझा करना चाहते हैं, तो आप निम्नानुसार ऐसा कर सकते हैं:
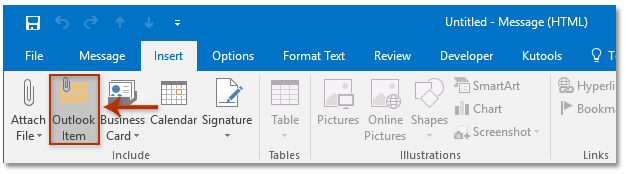
1। में मेल देखें, क्लिक करके एक नया ईमेल बनाएं होम > नई ईमेल.
2. नई संदेश विंडो में, कृपया क्लिक करें सम्मिलित करें > आउटलुक आइटम. स्क्रीनशॉट देखें:
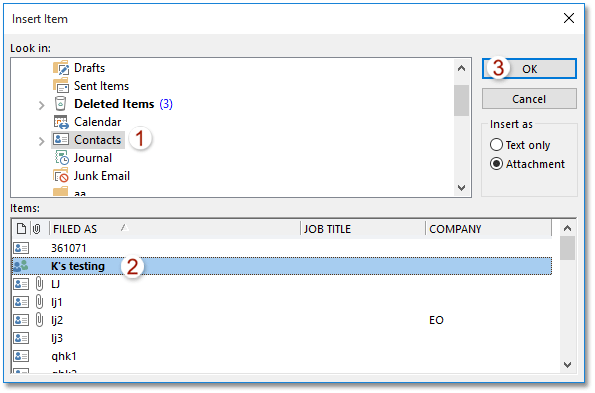
3. आरंभिक आइटम सम्मिलित करें संवाद बॉक्स में, कृपया:
(३) पर जाना यहां देखो बॉक्स, चयन करने के लिए क्लिक करें संपर्क फ़ोल्डर जिसमें आपके द्वारा साझा किए जाने वाले संपर्क समूह होंगे;
(३) पर जाना आइटम बॉक्स, और आपके द्वारा साझा किए जाने वाले एक या एकाधिक संपर्क समूहों का चयन करने के लिए क्लिक करें;
(3) क्लिक करें OK बटन। स्क्रीनशॉट देखें:
4. अब चयनित संपर्क समूह नए ईमेल में अनुलग्नक के रूप में जोड़े गए हैं। कृपया ईमेल लिखें और भेजें.
आउटलुक में आपको भेजे गए संपर्क समूह (वितरण सूची) को साझा/सहेजें
यदि आपको साझा संपर्क समूहों के साथ ईमेल प्राप्त हुए हैं, तो आप संपर्क समूहों को आउटलुक में आसानी से अपने संपर्क फ़ोल्डर में कॉपी और सहेज सकते हैं।
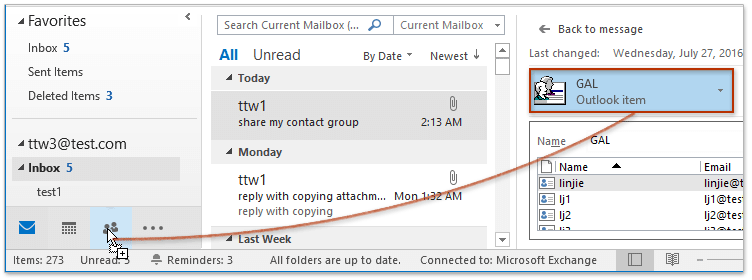
1। में मेल देखें, संपर्क समूह अनुलग्नकों वाले ईमेल को खोलने के लिए क्लिक करें पठन फलक.
2. में संपर्क समूहों का चयन करें पठन फलक, उन्हें लोग आइकन पर खींचें ![]() or
or ![]() नेविगेशन फलक पर, और तब तक माउस को छोड़ दें जब तक कि कर्सर बदल न जाए
नेविगेशन फलक पर, और तब तक माउस को छोड़ दें जब तक कि कर्सर बदल न जाए![]() . स्क्रीनशॉट देखें:
. स्क्रीनशॉट देखें:
अब तक निर्दिष्ट संपर्क समूह जिन्हें अन्य लोगों ने आपके साथ साझा किया है, उन्हें कॉपी करके आपके संपर्क फ़ोल्डर में सहेजा गया है।
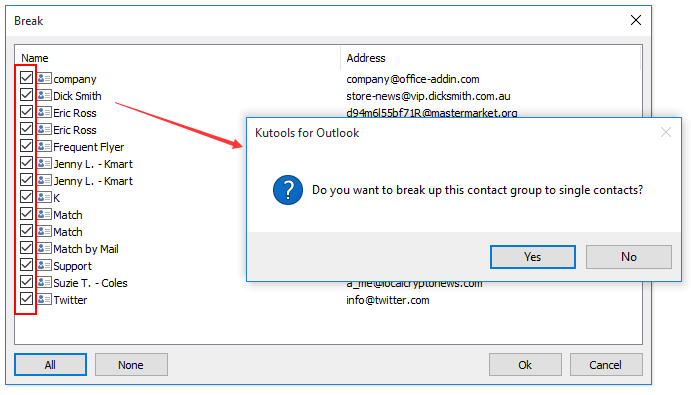
बैच संपर्क समूह (वितरण सूची) के प्रत्येक सदस्य को आउटलुक में व्यक्तिगत संपर्क के रूप में सहेजें
आउटलुक के लिए कुटूल्स के साथ संपर्क समूह तोड़ें सुविधा, आप आउटलुक में सभी या एकाधिक चयनित सदस्यों को व्यक्तिगत संपर्कों में तुरंत सहेज सकते हैं।
संबंधित आलेख
आउटलुक में वितरण सूची (संपर्क समूह) से संपर्क जोड़ें
आउटलुक में वितरण सूची (संपर्क समूह) में एकाधिक ईमेल प्रेषकों को जोड़ें
सर्वोत्तम कार्यालय उत्पादकता उपकरण
आउटलुक के लिए कुटूल - आपके आउटलुक को सुपरचार्ज करने के लिए 100 से अधिक शक्तिशाली सुविधाएँ
🤖 एआई मेल सहायक: एआई जादू के साथ त्वरित प्रो ईमेल - प्रतिभाशाली उत्तरों के लिए एक-क्लिक, सही टोन, बहुभाषी महारत। ईमेलिंग को सहजता से रूपांतरित करें! ...
📧 ईमेल स्वचालन: कार्यालय से बाहर (POP और IMAP के लिए उपलब्ध) / ईमेल भेजने का शेड्यूल करें / ईमेल भेजते समय नियमों के अनुसार ऑटो सीसी/बीसीसी / स्वतः अग्रेषित (उन्नत नियम) / स्वतः ग्रीटिंग जोड़ें / बहु-प्राप्तकर्ता ईमेल को स्वचालित रूप से अलग-अलग संदेशों में विभाजित करें ...
📨 ईमेल प्रबंधन: आसानी से ईमेल याद रखें / विषयों और अन्य लोगों द्वारा घोटाले वाले ईमेल को ब्लॉक करें / डुप्लिकेट ईमेल हटाएँ / उन्नत खोज / फ़ोल्डरों को समेकित करें ...
📁 अनुलग्नक प्रो: बैच सहेजें / बैच अलग करना / बैच संपीड़न / ऑटो सहेजें / ऑटो डिटैच / ऑटो कंप्रेस ...
🌟 इंटरफ़ेस जादू: 😊अधिक सुंदर और शानदार इमोजी / टैब्ड व्यू के साथ अपनी आउटलुक उत्पादकता बढ़ाएँ / आउटलुक को बंद करने के बजाय छोटा करें ...
???? एक-क्लिक चमत्कार: आने वाले अनुलग्नकों के साथ सभी को उत्तर दें / फ़िशिंग-रोधी ईमेल / 🕘प्रेषक का समय क्षेत्र दिखाएं ...
👩🏼🤝👩🏻 संपर्क एवं कैलेंडर: बैच चयनित ईमेल से संपर्क जोड़ें / किसी संपर्क समूह को अलग-अलग समूहों में विभाजित करें / जन्मदिन अनुस्मारक हटाएँ ...
के ऊपर 100 सुविधाएँ आपके अन्वेषण की प्रतीक्षा करें! अधिक जानने के लिए यहां क्लिक करें।

