मुख्य सामग्री पर जाएं

एक्सेल में सेल्स में फ़िट होने के लिए चित्रों का आकार कैसे बदलें?

लेखक: ज़ियाओयांग अंतिम संशोधित: 2014-09-02

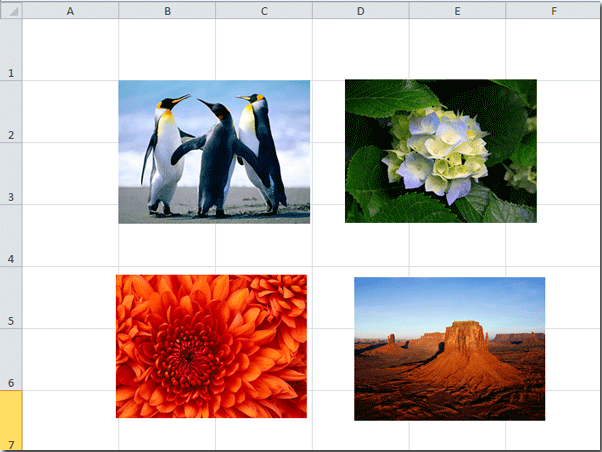
आम तौर पर डाले गए चित्र कोशिकाओं पर तैरते हैं, और अधिकांश समय एक चित्र बहुत सारी कोशिकाओं को कवर करता है। यदि किसी वर्कशीट में बड़ी संख्या में चित्र हैं, तो आप प्रत्येक चित्र को एक सेल में रखना चाह सकते हैं। लेकिन इससे कैसे निपटें? दरअसल, कोशिकाओं के आकार को तुरंत फिट करने के लिए चित्रों का आकार बदलने में हमारी मदद करने के कई पेचीदा तरीके हैं।

वीबी मैक्रो के साथ एकल सेल में फ़िट करने के लिए चयनित चित्र का आकार बदलें

एक्सेल के लिए कुटूल के साथ कोशिकाओं को फिट करने के लिए सम्मिलित चित्रों का आकार बदलें


तीर नीला दायां बुलबुला वीबी मैक्रो के साथ एकल सेल में फ़िट करने के लिए चयनित चित्र का आकार बदलें

हम किसी एकल सेल में फिट होने के लिए चयनित चित्र का आकार बदलने के लिए वीबी मैक्रोज़ लागू कर सकते हैं, लेकिन मैन्युअल रूप से चित्र की चौड़ाई और ऊंचाई का आकार नहीं बदल सकते। आप इसे निम्नलिखित चरणों से कर सकते हैं:

चरण 1: चित्रों को वर्कशीट में डालें, और एक चित्र का चयन करें जिसे आप एक सेल में फिट करने के लिए उसका आकार बदल देंगे।

दस्तावेज़-आकार-चित्र-से-फ़िट-कोशिकाओं1

चरण 2: नीचे रखें ALT + F11 कुंजियाँ, और यह खुल जाती है अनुप्रयोगों के लिए माइक्रोसॉफ्ट विज़ुअल बेसिक खिड़की.

चरण 3: क्लिक करें सम्मिलित करें > मॉड्यूल, और मॉड्यूल विंडो में निम्नलिखित मैक्रो चिपकाएँ।

वीबीए: सेल में फ़िट करने के लिए चयनित चित्र का आकार बदलें।

Public Sub FitPic()
On Error GoTo NOT_SHAPE
Dim PicWtoHRatio As Single
Dim CellWtoHRatio As Single
With Selection
PicWtoHRatio = .Width / .Height
End With
With Selection.TopLeftCell
CellWtoHRatio = .Width / .RowHeight
End With
Select Case PicWtoHRatio / CellWtoHRatio
Case Is > 1
With Selection
.Width = .TopLeftCell.Width
.Height = .Width / PicWtoHRatio
End With
Case Else
With Selection
.Height = .TopLeftCell.RowHeight
.Width = .Height * PicWtoHRatio
End With
End Select
With Selection
.Top = .TopLeftCell.Top
.Left = .TopLeftCell.Left
End With
Exit Sub
NOT_SHAPE:
MsgBox "Select a picture before running this macro."
End Sub

चरण 4: दबाएं F5 इस मैक्रो को चलाने की कुंजी.

चरण 5: एकल कक्ष में फिट होने के लिए अन्य चित्रों का आकार बदलने के लिए उपरोक्त चरणों को दोहराएं।

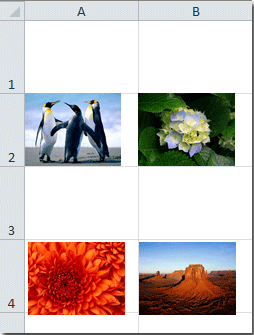
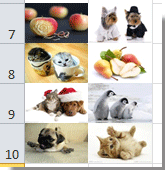
अब सभी सम्मिलित चित्रों का आकार बदल दिया गया है और कोशिकाओं में फिट कर दिया गया है। निम्नलिखित स्क्रीनशॉट देखें:

दस्तावेज़-आकार-चित्र-से-फ़िट-कोशिकाओं2

नोट: आप एक बार में केवल एक चित्र का आकार बदल सकते हैं। यदि आप एक बार में एक से अधिक चित्र चुनते हैं, तो एक चेतावनी संवाद बॉक्स पॉप अप हो जाएगा।


तीर नीला दायां बुलबुला एक्सेल के लिए कुटूल के साथ कोशिकाओं को फिट करने के लिए सम्मिलित चित्रों का आकार बदलें

यदि आपके पास एक्सेल के लिए कुटूल स्थापित, आप इसे लागू कर सकते हैं तस्वीरें आयात करें चित्र सम्मिलित करते समय सभी चित्रों को कोशिकाओं में फ़िट करने के लिए या निश्चित ऊंचाई के साथ आकार बदलने का उपकरण।

एक्सेल के लिए कुटूल इसमें 300 से अधिक उपयोगी एक्सेल टूल शामिल हैं। 30 दिनों में बिना किसी सीमा के प्रयास करने के लिए निःशुल्क। अब समझे.

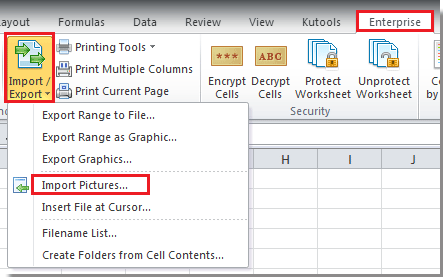
चरण 1: उस रेंज सेल का चयन करें जिसमें आप चित्र सम्मिलित करना चाहते हैं और क्लिक करें उद्यम >आयात निर्यात > तस्वीरें आयात करें. निम्नलिखित स्क्रीनशॉट देखें:

दस्तावेज़-आकार-चित्र-को-फ़िट-सेल-1

चरण 2: में तस्वीरें आयात करें संवाद बॉक्स में, ड्रॉप-डाउन सूची में सम्मिलित करने का क्रम चुनें और क्लिक करें फ़ाइल या फ़ोल्डर से आपको आवश्यक चित्र जोड़ने के लिए बटन, फिर क्लिक करें आकार बटन। स्क्रीनशॉट देखें:

दस्तावेज़-आकार-चित्र-को-फ़िट-सेल-2

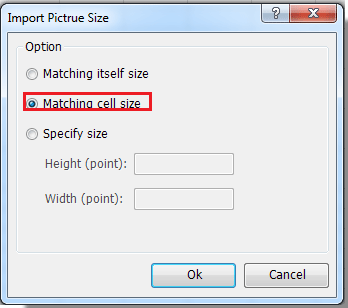
चरण 3: जांचें मिलान सेल आकार विकल्प। तब दबायें Ok > आयात संवाद बंद करने के लिए. स्क्रीनशॉट देखें:

दस्तावेज़-आकार-चित्र-को-फ़िट-सेल-3

अब आप देख सकते हैं कि कोशिकाओं को फिट करने के लिए चित्र डाले गए हैं।

दस्तावेज़-आकार-चित्र-को-फ़िट-सेल-4

नोट: आप चित्रों का आकार बदलने के लिए चरण 3 में सेल की ऊंचाई और चौड़ाई भी निर्दिष्ट कर सकते हैं।

अगर आप इसके बारे में और जानना चाहते हैं चित्र आयात करें सुविधा, कृपया देखें यहाँ उत्पन्न करें.


संबंधित आलेख:

Excel में चित्रों को उनके ऊपर शीघ्रता से फ़िट करने के लिए एकाधिक कक्षों का आकार कैसे बदलें?

सर्वोत्तम कार्यालय उत्पादकता उपकरण

🤖 कुटूल्स एआई सहयोगी: निम्न के आधार पर डेटा विश्लेषण में क्रांति लाएं: बुद्धिमान निष्पादन   |  कोड जनरेट करें  |  कस्टम फ़ॉर्मूले बनाएं  |  डेटा का विश्लेषण करें और चार्ट बनाएं  |  कुटूल फ़ंक्शंस का आह्वान करें...
लोकप्रिय सुविधाएँ: डुप्लिकेट ढूंढें, हाइलाइट करें या पहचानें   |  रिक्त पंक्तियाँ हटाएँ   |  डेटा खोए बिना कॉलम या सेल को संयोजित करें   |   फॉर्मूला के बिना गोल ...
सुपर लुकअप: एकाधिक मानदंड VLookup    मल्टीपल वैल्यू वीलुकअप  |   अनेक शीटों में VLookup   |   फजी लुकअप ....
उन्नत ड्रॉप-डाउन सूची: शीघ्रता से ड्रॉप डाउन सूची बनाएं   |  आश्रित ड्रॉप डाउन सूची   |  बहु-चयन ड्रॉप डाउन सूची ....
स्तम्भ प्रबंधक: कॉलमों की एक विशिष्ट संख्या जोड़ें  |  कॉलम ले जाएँ  |  छिपे हुए कॉलम की दृश्यता स्थिति टॉगल करें  |  रेंज और कॉलम की तुलना करें ...
फीचर्ड फीचर्स: ग्रिड फोकस   |  डिजाइन देखें   |   बड़ा फॉर्मूला बार    कार्यपुस्तिका एवं शीट प्रबंधक   |  संसाधन लाइब्रेरी (ऑटो टेक्स्ट)   |  खजूर बीनने वाला   |  कार्यपत्रकों को संयोजित करें   |  एन्क्रिप्ट/डिक्रिप्ट सेल    सूची के अनुसार ईमेल भेजें   |  सुपर फ़िल्टर   |   विशेष फ़िल्टर (फ़िल्टर बोल्ड/इटैलिक/स्ट्राइकथ्रू...) ...
शीर्ष 15 टूलसेट12 टेक्स्ट टूल्स (पाठ जोड़ें, अक्षर हटाएँ, ...)   |   50 + चार्ट प्रकार (गैन्ट चार्ट, ...)   |   40+ प्रैक्टिकल सूत्र (जन्मदिन के आधार पर आयु की गणना करें, ...)   |   19 निवेशन टूल्स (QR कोड डालें, पथ से चित्र सम्मिलित करें, ...)   |   12 रूपांतरण टूल्स (शब्दों को संख्याएँ, मुद्रा रूपांतरण, ...)   |   7 विलय और विभाजन टूल्स (उन्नत संयोजन पंक्तियाँ, विभाजन कोशिकाओं, ...)   |   ... और अधिक

एक्सेल के लिए कुटूल के साथ अपने एक्सेल कौशल को सुपरचार्ज करें, और पहले जैसी दक्षता का अनुभव करें। एक्सेल के लिए कुटूल उत्पादकता बढ़ाने और समय बचाने के लिए 300 से अधिक उन्नत सुविधाएँ प्रदान करता है।  वह सुविधा प्राप्त करने के लिए यहां क्लिक करें जिसकी आपको सबसे अधिक आवश्यकता है...

Description


ऑफिस टैब ऑफिस में टैब्ड इंटरफ़ेस लाता है, और आपके काम को बहुत आसान बनाता है

  • Word, Excel, PowerPoint में टैब्ड संपादन और रीडिंग सक्षम करें, प्रकाशक, एक्सेस, विसियो और प्रोजेक्ट।
  • नई विंडो के बजाय एक ही विंडो के नए टैब में एकाधिक दस्तावेज़ खोलें और बनाएं।
  • आपकी उत्पादकता 50% बढ़ जाती है, और आपके लिए हर दिन सैकड़ों माउस क्लिक कम हो जाते हैं!
Comments (15)
No ratings yet. Be the first to rate!
This comment was minimized by the moderator on the site
La macro posiziona l'immagine "Immagine 2" al centro della cella ("D5"), anche se questa è unita ad altre celle. Spero possa esservi utile

Sub ImpFoto()
Dim hcell As Single ' altezza cella
Dim Lcell As Single ' larghezza cella
Dim hfoto As Single ' altezza foto
Dim Lfoto As Single ' larghezza foto
Dim Rfoto As Single ' rapporto foto h/L

Range("D5").Select

hcell = Selection.Height
Lcell = Selection.Width
hfoto = ActiveSheet.Shapes("Immagine 2").Height
Lfoto = ActiveSheet.Shapes("Immagine 2").Width
Rfoto = hfoto / Lfoto

If hfoto < Lfoto Then
Lfoto = Lcell - 10
hfoto = Lfoto * Rfoto

If hfoto > hcell Then
hfoto = hcell - 3
Lfoto = hfoto / Rfoto
End If

ActiveSheet.Shapes("Immagine 2").Height = hfoto
ActiveSheet.Shapes("Immagine 2").Width = Lfoto
Else
hfoto = hcell - 10
Lfoto = hfoto / Rfoto
ActiveSheet.Shapes("Immagine 2").Height = hfoto
ActiveSheet.Shapes("Immagine 2").Width = Lfoto
End If

Range("D5").Select

With ActiveSheet.Shapes("Immagine 2")
.Top = Selection.Top + (Selection.Height - .Height) / 2
.Left = Selection.Left + (Selection.Width - .Width) / 2
End With
End Sub
This comment was minimized by the moderator on the site
Thank you, it really works!
This comment was minimized by the moderator on the site
Hi, Need this code disabling the lock aspect ratio
This comment was minimized by the moderator on the site
Hi..
perfact solution. But i want that function to work with command button. i need to make a command button to insert and auto resize to cell size. please help.
This comment was minimized by the moderator on the site
Brilliant! Works great! Just what I was looking for! Thank you!
This comment was minimized by the moderator on the site
it works if the cells are not merged. unfortunately, I merged some cells and it fits only in the upper left cell which makes the photo very tiny.
This comment was minimized by the moderator on the site
Hi, I really love this macro that makes images fit cells, it really helped me with some work stuff. But does anyone know how to write this code for applescript? I have to use macs and the apple version of excel, Numbers, only uses applescript. Help! Many thanks, Harry
This comment was minimized by the moderator on the site
Thanks it did work but I have about 500 pictures so I don't want to do them one at a time - how do I do them all at the same time please?
This comment was minimized by the moderator on the site
Works!! But i have one question, i want to fit a img in a range of cells merged, how can i do it?
This comment was minimized by the moderator on the site
Public Sub FitPic()
'https://www.extendoffice.com/documents/excel/1060-excel-resize-picture-to-fit-cell.html
'Slight modification to resize into merged cells
On Error GoTo NOT_SHAPE
Dim PicWtoHRatio As Single
Dim CellWtoHRatio As Single
With Selection
PicWtoHRatio = .Width / .Height
End With
With Selection.TopLeftCell
CellWtoHRatio = .MergeArea.Width / .MergeArea.Height
End With
Select Case PicWtoHRatio / CellWtoHRatio
Case Is > 1
With Selection
.Width = .TopLeftCell.MergeArea.Width
.Height = .Width / PicWtoHRatio
End With
Case Else
With Selection
.Height = .TopLeftCell.MergeArea.Height
.Width = .Height * PicWtoHRatio
End With
End Select
With Selection
.Top = .TopLeftCell.MergeArea.Top
.Left = .TopLeftCell.MergeArea.Left
.Placement = xlMoveAndSize
End With
Exit Sub
NOT_SHAPE:
MsgBox "Select a picture before running this macro."
End Sub
This comment was minimized by the moderator on the site
[quote]Works!! But i have one question, i want to fit a img in a range of cells merged, how can i do it?By Marcelo[/quote] Marcelo did you get the updated marco for the merged cell? I am trying to do the same thing. thanks
This comment was minimized by the moderator on the site
I tried this macro last night and it adjust only the height. The width it doesn't incorrectly. Any Help please?
This comment was minimized by the moderator on the site
Thank you this was perfect!!
There are no comments posted here yet
Load More
Please leave your comments in English
Posting as Guest
×
Rate this post:
0   Characters
Suggested Locations