आउटलुक में ऑटो-कम्प्लीट सूची में संपर्क कैसे जोड़ें?
आउटलुक में ऑटो-कम्प्लीट फ़ंक्शन आपको ईमेल संदेश लिखते समय जो दर्ज किया गया है उसके आधार पर प्राप्तकर्ताओं को आसानी से ढूंढने में मदद करता है। डिफ़ॉल्ट रूप से, ईमेल भेजने के बाद, स्वतः पूर्ण सूची संपर्कों के ईमेल पते से भर जाएगी। दरअसल, आप भविष्य के काम को और अधिक कुशल बनाने के लिए एक साथ कई संपर्क पतों के साथ स्वत: पूर्ण सूची को मैन्युअल रूप से भर सकते हैं। इस लेख में, हम आपको आउटलुक में एक ही समय में एकाधिक ईमेल पतों के साथ स्वत: पूर्ण सूची भरने की एक विधि दिखाएंगे।
आउटलुक में स्वतः पूर्ण सूची में संपर्क जोड़ें
- के साथ ईमेल स्वचालित करें ऑटो सीसी/बीसीसी, ऑटो फ़ॉरवर्ड नियमों के अनुसार; भेजना स्व उत्तर (कार्यालय से बाहर) एक्सचेंज सर्वर की आवश्यकता के बिना...
- जैसे अनुस्मारक प्राप्त करें बीसीसी चेतावनी जब आप बीसीसी सूची में हों तब सभी को उत्तर देते समय, और अनुलग्नक गुम होने पर याद दिलाएँ भूले हुए अनुलग्नकों के लिए...
- के साथ ईमेल दक्षता में सुधार करें उत्तर (सभी) संलग्नक के साथ, हस्ताक्षर या विषय में स्वतः अभिवादन या दिनांक और समय जोड़ें, एकाधिक ईमेल का उत्तर दें...
- के साथ ईमेलिंग को सुव्यवस्थित करें ईमेल याद करें, अनुलग्नक उपकरण (सभी को संपीड़ित करें, स्वचालित रूप से सभी को सहेजें...), डुप्लिकेट निकालें, तथा त्वरित रिपोर्ट...
 आउटलुक में स्वतः पूर्ण सूची में संपर्क जोड़ें
आउटलुक में ऑटो-पूर्ण सूची में एकाधिक संपर्क जोड़ने के लिए, कृपया निम्नानुसार कार्य करें: 1. एक ईमेल संदेश बनाएं।
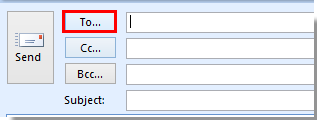
1। में मैसेज खिड़की पर क्लिक करें सेवा मेरे संदेश शीर्षलेख में बटन.

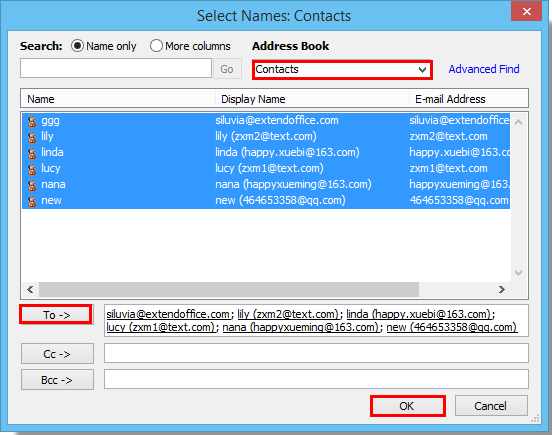
2। में नाम चुनें संवाद बकस:

3. फिर सभी चयनित संपर्क इसमें जोड़ दिए जाते हैं सेवा मेरे में फ़ील्ड मैसेज स्वत: पूर्ण सूची के रूप में विंडो। फिर बंद कर दें मैसेज सहेजे बिना विंडो.
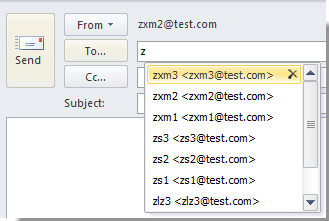
4. अब से, जब आप प्राप्तकर्ताओं के ईमेल पते का पहला अक्षर To या Cc फ़ील्ड में टाइप करते हैं, तो आपके द्वारा ऊपर चुने गए सभी संबंधित संपर्क तुरंत ऑटो-पूर्ण सूची में दिखाई देंगे। स्क्रीनशॉट देखें:

सर्वोत्तम कार्यालय उत्पादकता उपकरण
आउटलुक के लिए कुटूल - आपके आउटलुक को सुपरचार्ज करने के लिए 100 से अधिक शक्तिशाली सुविधाएँ
🤖 एआई मेल सहायक: एआई जादू के साथ त्वरित प्रो ईमेल - प्रतिभाशाली उत्तरों के लिए एक-क्लिक, सही टोन, बहुभाषी महारत। ईमेलिंग को सहजता से रूपांतरित करें! ...
📧 ईमेल स्वचालन: कार्यालय से बाहर (POP और IMAP के लिए उपलब्ध) / ईमेल भेजने का शेड्यूल करें / ईमेल भेजते समय नियमों के अनुसार ऑटो सीसी/बीसीसी / स्वतः अग्रेषित (उन्नत नियम) / स्वतः ग्रीटिंग जोड़ें / बहु-प्राप्तकर्ता ईमेल को स्वचालित रूप से अलग-अलग संदेशों में विभाजित करें ...
📨 ईमेल प्रबंधन: आसानी से ईमेल याद रखें / विषयों और अन्य लोगों द्वारा घोटाले वाले ईमेल को ब्लॉक करें / डुप्लिकेट ईमेल हटाएँ / उन्नत खोज / फ़ोल्डरों को समेकित करें ...
📁 अनुलग्नक प्रो: बैच सहेजें / बैच अलग करना / बैच संपीड़न / ऑटो सहेजें / ऑटो डिटैच / ऑटो कंप्रेस ...
🌟 इंटरफ़ेस जादू: 😊अधिक सुंदर और शानदार इमोजी / टैब्ड व्यू के साथ अपनी आउटलुक उत्पादकता बढ़ाएँ / आउटलुक को बंद करने के बजाय छोटा करें ...
???? एक-क्लिक चमत्कार: आने वाले अनुलग्नकों के साथ सभी को उत्तर दें / फ़िशिंग-रोधी ईमेल / 🕘प्रेषक का समय क्षेत्र दिखाएं ...
👩🏼🤝👩🏻 संपर्क एवं कैलेंडर: बैच चयनित ईमेल से संपर्क जोड़ें / किसी संपर्क समूह को अलग-अलग समूहों में विभाजित करें / जन्मदिन अनुस्मारक हटाएँ ...
के ऊपर 100 सुविधाएँ आपके अन्वेषण की प्रतीक्षा करें! अधिक जानने के लिए यहां क्लिक करें।

