आउटलुक में अपॉइंटमेंट का रंग कैसे बदलें?
कभी-कभी, आप अपनी नियुक्तियों को हाइलाइट करना और उन्हें Microsoft Outlook में आसानी से ढूंढना चाह सकते हैं। सामान्य तरीका नियुक्तियों का रंग बदलना है। यहां मैं माइक्रोसॉफ्ट आउटलुक में आसानी से अपॉइंटमेंट रंग बदलने के लिए दो तरकीबें पेश करूंगा।
आउटलुक में एक अपॉइंटमेंट के लिए रंग बदलें
आउटलुक में एकाधिक नियुक्तियों के लिए स्वत: रंग बदलें
- के साथ ईमेल स्वचालित करें ऑटो सीसी/बीसीसी, ऑटो फ़ॉरवर्ड नियमों के अनुसार; भेजना स्व उत्तर (कार्यालय से बाहर) एक्सचेंज सर्वर की आवश्यकता के बिना...
- जैसे अनुस्मारक प्राप्त करें बीसीसी चेतावनी जब आप बीसीसी सूची में हों तब सभी को उत्तर देते समय, और अनुलग्नक गुम होने पर याद दिलाएँ भूले हुए अनुलग्नकों के लिए...
- के साथ ईमेल दक्षता में सुधार करें उत्तर (सभी) संलग्नक के साथ, हस्ताक्षर या विषय में स्वतः अभिवादन या दिनांक और समय जोड़ें, एकाधिक ईमेल का उत्तर दें...
- के साथ ईमेलिंग को सुव्यवस्थित करें ईमेल याद करें, अनुलग्नक उपकरण (सभी को संपीड़ित करें, स्वचालित रूप से सभी को सहेजें...), डुप्लिकेट निकालें, तथा त्वरित रिपोर्ट...
 आउटलुक में एक अपॉइंटमेंट के लिए रंग बदलें
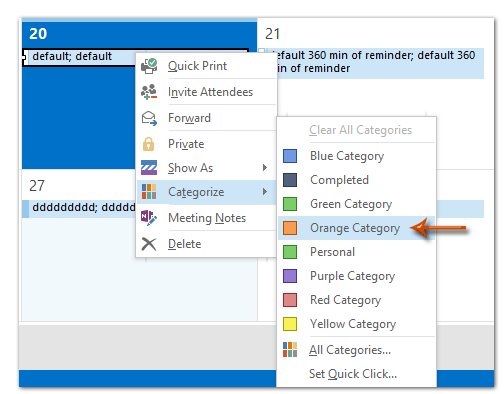
माइक्रोसॉफ्ट आउटलुक में अपॉइंटमेंट का रंग बदलना काफी आसान है, और आप अपॉइंटमेंट पर राइट-क्लिक करके, चयन करके इसे आसानी से कर सकते हैं। वर्ग ड्रॉप डाउन सूची से, और सबमेनू से एक रंग निर्दिष्ट करें। नीचे स्क्रीन शॉट देखें:
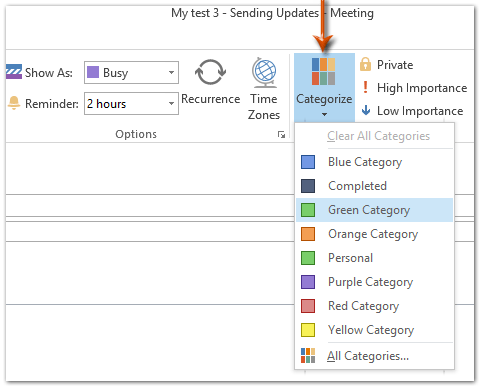
अपॉइंटमेंट बनाते समय, आप क्लिक करके उसका रंग भी बदल सकते हैं श्रेणीबद्ध करना पर बटन नियुक्ति टैब, और ड्रॉप डाउन सूची से एक श्रेणी का रंग निर्दिष्ट करें।
आउटलुक में एकाधिक नियुक्तियों के लिए स्वत: रंग बदलें
इस अनुभाग में, मैं आपको कैलेंडर फ़ोल्डर की दृश्य सेटिंग्स बदलने और सशर्त स्वरूपण करने के लिए मार्गदर्शन करूंगा, ताकि माइक्रोसॉफ्ट आउटलुक स्वचालित रूप से कई नियुक्तियों के लिए आसानी से रंग बदल सके।
चरण 1: कैलेंडर दृश्य पर जाएँ, और कैलेंडर फ़ोल्डर खोलें जहाँ आप एकाधिक नियुक्तियों के लिए रंग बदलेंगे।
चरण 2: इस पर क्लिक करें दृश्य सेटिंग्स पर बटन देखें टैब.
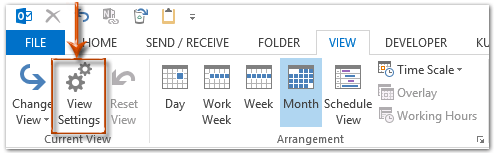
नोट: आउटलुक 2007 में, आप क्लिक कर सकते हैं देखें > वर्तमान दृश्य > वर्तमान दृश्य को अनुकूलित करें.
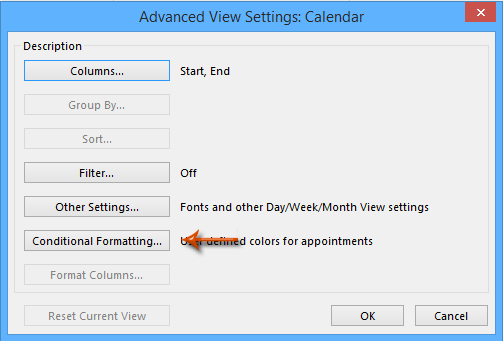
चरण 3: शुरुआती संवाद बॉक्स में, क्लिक करें सशर्त फॉर्मेटिंग बटन (या स्वचालित स्वरूपण बटन)।
चरण 4: अब आप सशर्त स्वरूपण संवाद बॉक्स में पहुँचें, और:
(1) क्लिक करें बटन;
(2) नए नियम के लिए एक नाम दर्ज करें नाम डिब्बा;
(3) क्लिक करें रंग बॉक्स, और ड्रॉप डाउन सूची से एक रंग निर्दिष्ट करें, नीचे स्क्रीन शॉट देखें;
(4) क्लिक करें शर्त बटन.

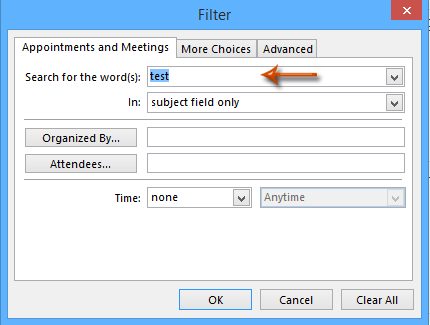
चरण 5: पॉप अप होने वाले फ़िल्टर संवाद बॉक्स में, अपना फ़िल्टर मानदंड निर्दिष्ट करें।
उदाहरण के लिए, आप "के पाठ के साथ सभी नियुक्तियों के लिए रंग बदल देंगे"परीक्षण"केवल उनके विषय क्षेत्र में, बस" का पाठ दर्ज करेंपरीक्षण" में शब्द खोजें डिब्बा।
चरण 6: सभी पर क्लिक करें OK सभी डायलॉग बॉक्स बंद करने के लिए बटन।
फिर Microsoft Outlook उन सभी नियुक्तियों का रंग बदल देता है जो चरण 5 में आपके द्वारा निर्दिष्ट फ़िल्टर मानदंडों को पूरा करते हैं।
सर्वोत्तम कार्यालय उत्पादकता उपकरण
आउटलुक के लिए कुटूल - आपके आउटलुक को सुपरचार्ज करने के लिए 100 से अधिक शक्तिशाली सुविधाएँ
🤖 एआई मेल सहायक: एआई जादू के साथ त्वरित प्रो ईमेल - प्रतिभाशाली उत्तरों के लिए एक-क्लिक, सही टोन, बहुभाषी महारत। ईमेलिंग को सहजता से रूपांतरित करें! ...
📧 ईमेल स्वचालन: कार्यालय से बाहर (POP और IMAP के लिए उपलब्ध) / ईमेल भेजने का शेड्यूल करें / ईमेल भेजते समय नियमों के अनुसार ऑटो सीसी/बीसीसी / स्वतः अग्रेषित (उन्नत नियम) / स्वतः ग्रीटिंग जोड़ें / बहु-प्राप्तकर्ता ईमेल को स्वचालित रूप से अलग-अलग संदेशों में विभाजित करें ...
📨 ईमेल प्रबंधन: आसानी से ईमेल याद रखें / विषयों और अन्य लोगों द्वारा घोटाले वाले ईमेल को ब्लॉक करें / डुप्लिकेट ईमेल हटाएँ / उन्नत खोज / फ़ोल्डरों को समेकित करें ...
📁 अनुलग्नक प्रो: बैच सहेजें / बैच अलग करना / बैच संपीड़न / ऑटो सहेजें / ऑटो डिटैच / ऑटो कंप्रेस ...
🌟 इंटरफ़ेस जादू: 😊अधिक सुंदर और शानदार इमोजी / टैब्ड व्यू के साथ अपनी आउटलुक उत्पादकता बढ़ाएँ / आउटलुक को बंद करने के बजाय छोटा करें ...
???? एक-क्लिक चमत्कार: आने वाले अनुलग्नकों के साथ सभी को उत्तर दें / फ़िशिंग-रोधी ईमेल / 🕘प्रेषक का समय क्षेत्र दिखाएं ...
👩🏼🤝👩🏻 संपर्क एवं कैलेंडर: बैच चयनित ईमेल से संपर्क जोड़ें / किसी संपर्क समूह को अलग-अलग समूहों में विभाजित करें / जन्मदिन अनुस्मारक हटाएँ ...
के ऊपर 100 सुविधाएँ आपके अन्वेषण की प्रतीक्षा करें! अधिक जानने के लिए यहां क्लिक करें।

