आउटलुक में कैलेंडर में गैर-कार्य घंटों को कैसे छिपाएं?
जैसा कि आप जानते हैं, माइक्रोसॉफ्ट आउटलुक कैलेंडर के दिन दृश्य में पूरे दिन को 12:00 पूर्वाह्न से 11:59 अपराह्न तक दिखाता है, हालांकि हमने काम के घंटे निर्धारित किए हैं। गैर-कामकाजी घंटे बहुत अधिक जगह लेते हैं और उपयोगकर्ताओं को एक मिनट में सटीक कामकाजी घंटों का पता लगाने में पहेली बनाते हैं। हालाँकि, आप आउटलुक में गैर-व्यावसायिक घंटों को छिपा नहीं सकते। इस लेख में, मैं माइक्रोसॉफ्ट आउटलुक में कैलेंडर में गैर-कार्यशील क्षेत्रों को रंग के साथ कवर करने के लिए एक समाधान पेश करूंगा।
- के साथ ईमेल स्वचालित करें ऑटो सीसी/बीसीसी, ऑटो फ़ॉरवर्ड नियमों के अनुसार; भेजना स्व उत्तर (कार्यालय से बाहर) एक्सचेंज सर्वर की आवश्यकता के बिना...
- जैसे अनुस्मारक प्राप्त करें बीसीसी चेतावनी जब आप बीसीसी सूची में हों तब सभी को उत्तर देते समय, और अनुलग्नक गुम होने पर याद दिलाएँ भूले हुए अनुलग्नकों के लिए...
- के साथ ईमेल दक्षता में सुधार करें उत्तर (सभी) संलग्नक के साथ, हस्ताक्षर या विषय में स्वतः अभिवादन या दिनांक और समय जोड़ें, एकाधिक ईमेल का उत्तर दें...
- के साथ ईमेलिंग को सुव्यवस्थित करें ईमेल याद करें, अनुलग्नक उपकरण (सभी को संपीड़ित करें, स्वचालित रूप से सभी को सहेजें...), डुप्लिकेट निकालें, तथा त्वरित रिपोर्ट...
चूँकि गैर-कार्य घंटों को वास्तव में कैलेंडर से छिपाया नहीं जा सकता है वैकल्पिक हल, हम आपको दैनिक आवर्ती अपॉइंटमेंट बनाने और गैर-कार्यशील क्षेत्रों को रंग से कवर करने के लिए मार्गदर्शन करेंगे। आप इस प्रकार कर सकते हैं:
चरण 1: कैलेंडर दृश्य पर जाएँ, और निर्दिष्ट कैलेंडर खोलें जिसमें आप गैर-कार्य घंटों को छिपाएंगे।
चरण 2: कैलेंडर दिखाएँ दिन पर क्लिक करके देखें दृश्य बदलो > कैलेंडर और दिन पर अलग से बटन लगाएं देखें टैब.
 |
 |
नोट: आउटलुक 2007 में, आप क्लिक कर सकते हैं देखें > वर्तमान दृश्य > दिन/सप्ताह/माह, और उसके बाद क्लिक करें दिन कैलेंडर के ऊपर बटन.
चरण 3: इसके साथ एक नई नियुक्ति बनाएं:
- आउटलुक 2010 और नए संस्करणों में, क्लिक करें नव नियुक्ति पर बटन होम टैब;
- आउटलुक 2007 में, क्लिक करें पट्टिका > नया > नियुक्ति.
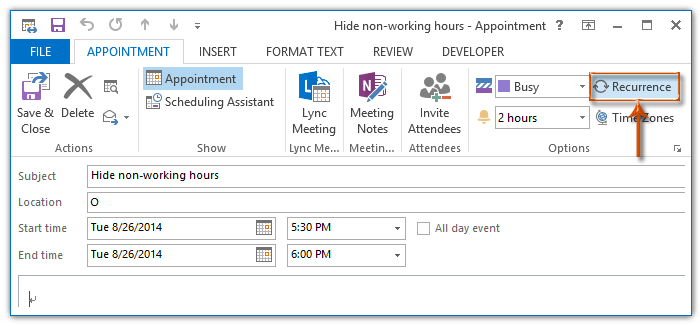
चरण 4: नई आने वाली अपॉइंटमेंट विंडो में, विषय और स्थान निर्दिष्ट करें और फिर क्लिक करें पुनरावृत्ति पर बटन नियुक्ति टैब.
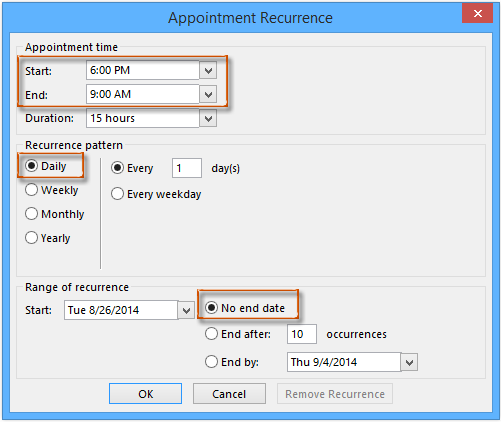
चरण 5: अब अपॉइंटमेंट पुनरावृत्ति संवाद बॉक्स में,
(1) में प्रारंभ बॉक्स में, वह समय दर्ज करें जब आप प्रतिदिन अपना काम समाप्त करते हैं, उदाहरण के लिए शाम 6:00 बजे;
(2) में समाप्त बॉक्स में, वह समय दर्ज करें जब आप प्रतिदिन अपना काम शुरू करते हैं, जैसे सुबह 9:00 बजे;
(3) जाँच करें दैनिक में पुनरावृत्ति पैटर्न अनुभाग;
(4) जाँच करें कोई समाप्ति तिथि नहीं में पुनरावृत्ति की सीमा अनुभाग;
(5) क्लिक करें OK बटन.
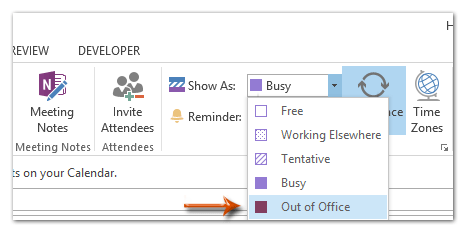
चरण 6: अब आप अपॉइंटमेंट विंडो पर वापस आएं, और क्लिक करें के रूप में दर्शाएं बॉक्स पर नियुक्ति टैब, और चुनें कार्यालय से बाहर ड्रॉप डाउन सूची से. नीचे स्क्रीन शॉट देखें:
चरण 7: इस नई नियुक्ति को लिखें, और क्लिक करें सहेजे बंद करें बटन.
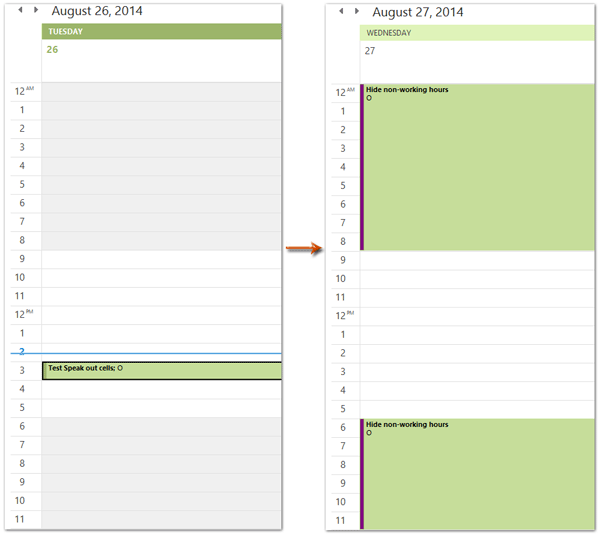
फिर आप देखेंगे कि आवर्ती सीमा के दूसरे दिन से कैलेंडर के दिन दृश्य में सभी गैर-कार्य घंटों को रंग से कवर किया गया है।
सर्वोत्तम कार्यालय उत्पादकता उपकरण
आउटलुक के लिए कुटूल - आपके आउटलुक को सुपरचार्ज करने के लिए 100 से अधिक शक्तिशाली सुविधाएँ
🤖 एआई मेल सहायक: एआई जादू के साथ त्वरित प्रो ईमेल - प्रतिभाशाली उत्तरों के लिए एक-क्लिक, सही टोन, बहुभाषी महारत। ईमेलिंग को सहजता से रूपांतरित करें! ...
📧 ईमेल स्वचालन: कार्यालय से बाहर (POP और IMAP के लिए उपलब्ध) / ईमेल भेजने का शेड्यूल करें / ईमेल भेजते समय नियमों के अनुसार ऑटो सीसी/बीसीसी / स्वतः अग्रेषित (उन्नत नियम) / स्वतः ग्रीटिंग जोड़ें / बहु-प्राप्तकर्ता ईमेल को स्वचालित रूप से अलग-अलग संदेशों में विभाजित करें ...
📨 ईमेल प्रबंधन: आसानी से ईमेल याद रखें / विषयों और अन्य लोगों द्वारा घोटाले वाले ईमेल को ब्लॉक करें / डुप्लिकेट ईमेल हटाएँ / उन्नत खोज / फ़ोल्डरों को समेकित करें ...
📁 अनुलग्नक प्रो: बैच सहेजें / बैच अलग करना / बैच संपीड़न / ऑटो सहेजें / ऑटो डिटैच / ऑटो कंप्रेस ...
🌟 इंटरफ़ेस जादू: 😊अधिक सुंदर और शानदार इमोजी / टैब्ड व्यू के साथ अपनी आउटलुक उत्पादकता बढ़ाएँ / आउटलुक को बंद करने के बजाय छोटा करें ...
???? एक-क्लिक चमत्कार: आने वाले अनुलग्नकों के साथ सभी को उत्तर दें / फ़िशिंग-रोधी ईमेल / 🕘प्रेषक का समय क्षेत्र दिखाएं ...
👩🏼🤝👩🏻 संपर्क एवं कैलेंडर: बैच चयनित ईमेल से संपर्क जोड़ें / किसी संपर्क समूह को अलग-अलग समूहों में विभाजित करें / जन्मदिन अनुस्मारक हटाएँ ...
के ऊपर 100 सुविधाएँ आपके अन्वेषण की प्रतीक्षा करें! अधिक जानने के लिए यहां क्लिक करें।

