किसी खाते को कैसे हटाएं लेकिन उसके ईमेल को आउटलुक में कैसे रखें?
कल्पना कीजिए कि आपने माइक्रोसॉफ्ट आउटलुक में कई ईमेल खाते स्थापित किए हैं, लेकिन आप पाते हैं कि आप उनमें से कुछ का उपयोग शायद ही कभी करते हैं। आप इन कम सक्रिय खातों को हटाने पर विचार कर सकते हैं। आमतौर पर, Microsoft Outlook से किसी ईमेल खाते को हटाने से उससे संबंधित ईमेल भी हट जाते हैं। हालाँकि, यह आलेख आपको Microsoft Outlook से ईमेल खातों के संदेशों को संरक्षित करते हुए उन्हें ख़त्म करने की विभिन्न तकनीकों के बारे में मार्गदर्शन करेगा।
- के साथ ईमेल स्वचालित करें ऑटो सीसी/बीसीसी, ऑटो फ़ॉरवर्ड नियमों के अनुसार; भेजना स्व उत्तर (कार्यालय से बाहर) एक्सचेंज सर्वर की आवश्यकता के बिना...
- जैसे अनुस्मारक प्राप्त करें बीसीसी चेतावनी जब आप बीसीसी सूची में हों तब सभी को उत्तर देते समय, और अनुलग्नक गुम होने पर याद दिलाएँ भूले हुए अनुलग्नकों के लिए...
- के साथ ईमेल दक्षता में सुधार करें उत्तर (सभी) संलग्नक के साथ, हस्ताक्षर या विषय में स्वतः अभिवादन या दिनांक और समय जोड़ें, एकाधिक ईमेल का उत्तर दें...
- के साथ ईमेलिंग को सुव्यवस्थित करें ईमेल याद करें, अनुलग्नक उपकरण (सभी को संपीड़ित करें, स्वचालित रूप से सभी को सहेजें...), डुप्लिकेट निकालें, तथा त्वरित रिपोर्ट...
एक खाता हटाएं लेकिन मूल डेटा फ़ाइल को सहेजकर उसका ईमेल रखें
यह विधि आपको Microsoft Outlook से एक ईमेल खाता हटाने में मार्गदर्शन करेगी, लेकिन इस ईमेल खाते के सभी आइटम Microsoft Outlook में रखें।
महत्वपूर्ण लेख: यह प्रक्रिया उन ईमेल खातों के लिए डिज़ाइन की गई है जो .pst डेटा फ़ाइलों का उपयोग करते हैं। यदि आपका खाता .ost फ़ाइलों पर संचालित होता है, तो सुनिश्चित करें उन्हें .pst के रूप में परिवर्तित और निर्यात करें पहला। जब आप खाता हटाने की प्रक्रिया आगे बढ़ाते हैं तो किसी भी ईमेल डेटा को खोने से बचाने के लिए यह कदम महत्वपूर्ण है।
- ओपन खाता सेटिंग्स डायलॉग बॉक्स क्लिक करके पट्टिका > जानकारी > खाता सेटिंग्स > खाता सेटिंग्स.

- में खाता सेटिंग्स संवाद बॉक्स, पर ईमेल टैब, इन चरणों का पालन करें:
- वह ईमेल खाता चुनें जिसे आप हटा देंगे. सुनिश्चित करें कि आपके द्वारा चुना गया खाता .pst डेटा फ़ाइल से संबद्ध है। यदि यह किसी .ost फ़ाइल से जुड़ा हुआ है, तो खाते को हटाने से सभी ईमेल नष्ट हो सकते हैं।
- दबाएं हटाना बटन.
- दबाएं समापन डायलॉग बॉक्स से बाहर निकलने के लिए नीचे बटन।

- अब आप आउटलुक के मुख्य इंटरफ़ेस पर वापस आ गए हैं। क्लिक पट्टिका > ओपन एंड एक्सपोर्ट > Outlook डेटा फ़ाइल खोलें.
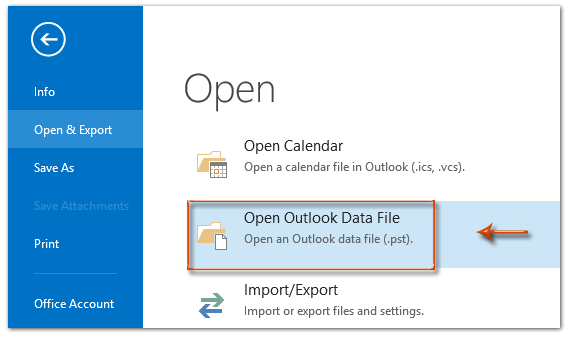
- पॉप-अप में Outlook डेटा फ़ाइल खोलें विंडो, उस डेटा फ़ाइल का पता लगाएं जिसे आप एक्सेस करना चाहते हैं। इसे चुनें और फिर क्लिक करें प्रारंभिक बटन. सुझाव: यदि आपकी .pst फ़ाइल किसी गैर-डिफ़ॉल्ट स्थान पर संग्रहीत है, तो .pst फ़ाइल खोलने के लिए उस विशिष्ट फ़ोल्डर पर जाएँ।

परिणाम
ईमेल खाता अब आपके Microsoft Outlook से हटा दिया गया है; हालाँकि, इस खाते से जुड़े फ़ोल्डर नेविगेशन फलक में दृश्यमान और पहुंच योग्य रहते हैं।
किसी खाते को हटा दें लेकिन उसका ईमेल कॉपी और पेस्ट करके रखें
दरअसल, माइक्रोसॉफ्ट आउटलुक से किसी ईमेल खाते को हटाने से पहले, हम उसके सभी ईमेल को मैन्युअल रूप से कॉपी और पेस्ट करके अन्य फ़ोल्डरों में सहेज सकते हैं। ऐसा करने के लिए यहां एक विस्तृत मार्गदर्शिका दी गई है:
- जिस खाते को आप हटाने की योजना बना रहे हैं उससे संबद्ध नेविगेशन फलक में ईमेल फ़ोल्डर खोलें जिसमें वे ईमेल हैं जिन्हें आप संरक्षित करना चाहते हैं।

- दबाएँ Ctrl + एक खुले हुए फ़ोल्डर में सभी ईमेल का चयन करने के लिए।
- दबाएँ Ctrl + सी इन ईमेल संदेशों की प्रतिलिपि बनाने के लिए.
- उस फ़ोल्डर पर जाएँ जहाँ आप इन ईमेल को स्थानांतरित करना चाहते हैं। मेरे उदाहरण में, मैं एक अलग ईमेल खाते का इनबॉक्स खोलूंगा जैसा कि नीचे दिखाया गया है।

- दबाएँ Ctrl + V का सभी कॉपी किए गए ईमेल संदेशों को इस खुले हुए फ़ोल्डर में पेस्ट करने के लिए।
सुझाव:
- जिस खाते को आप हटा रहे हैं उसके अन्य फ़ोल्डरों से ईमेल संदेशों को स्थानांतरित करने के लिए चरण 1 से 5 दोहराएँ।
- इस पद्धति में सबफ़ोल्डर शामिल नहीं हैं. सबफ़ोल्डर में ईमेल के लिए, आपको प्रत्येक सबफ़ोल्डर के लिए चरण 1 से 5 को दोहराना होगा।
- ओपन खाता सेटिंग्स डायलॉग बॉक्स क्लिक करके पट्टिका > जानकारी > खाता सेटिंग्स > खाता सेटिंग्स.
- में खाता सेटिंग्स संवाद बॉक्स, पर ईमेल टैब, इन चरणों का पालन करें:
- वह ईमेल खाता चुनें जिसे आप हटा देंगे.
- दबाएं हटाना बटन.
- दबाएं समापन डायलॉग बॉक्स से बाहर निकलने के लिए नीचे बटन।

खाता हटाने से पहले ईमेल को PST फ़ाइल में निर्यात करें
आप जिस खाते से ईमेल हटा रहे हैं उसे आउटलुक में बनाए रखने के लिए, उन्हें पीएसटी (आउटलुक डेटा फ़ाइल) के रूप में निर्यात करना एक विश्वसनीय तरीका है। यह प्रक्रिया आपके ईमेल का बैकअप बनाती है, जिसे खाता हटाए जाने के बाद भी एक्सेस किया जा सकता है। इसे करने का तरीका यहां बताया गया है:
- ओपन आयात और निर्यात विज़ार्ड डायलॉग बॉक्स क्लिक करके पट्टिका > ओपन एंड एक्सपोर्ट > आयात निर्यात.
- विज़ार्ड में, चुनें एक फ़ाइल में निर्यात करें, और क्लिक करें अगला बटन.

- में फ़ाइल में निर्यात करें संवाद बॉक्स में, चयन करें आउटलुक डेटा फ़ाइल (.pst) > अगला.

- में आउटलुक डेटा फ़ाइल निर्यात करें संवाद बॉक्स में, उस ईमेल खाते का चयन करें जिसे आप बाद में उसका डेटा निर्यात करने के लिए हटा देंगे, सुनिश्चित करें सबफोल्डर्स शामिल करें चेक किया गया है, और क्लिक करें अगला.

- निर्यात पैरामीटर इस प्रकार सेट करें:
- क्लिक करें ब्राउज, पीएसटी फ़ाइल को सहेजने के लिए एक फ़ोल्डर का चयन करें और फ़ाइल को नाम दें।
- चुनना डुप्लिकेट आइटम निर्यात न करें विकल्प.
- क्लिक करें अंत.

- RSI आउटलुक डेटा फ़ाइल बनाएँ संवाद दिखाई देगा:
- पासवर्ड जोड़ने के लिए इसे दोनों में दर्ज करें पासवर्ड और पासवर्ड को सत्यापित करें बॉक्स, फिर क्लिक करें OK.
- पासवर्ड जोड़ना छोड़ने के लिए क्लिक करें रद्द करना.

इन चरणों को पूरा करने के बाद, आप कर सकते हैं प्रारंभिक विधि में उल्लिखित प्रक्रिया के साथ आगे बढ़ें मूल ईमेल को बरकरार रखते हुए मौजूदा ईमेल खाते को हटाना।
सर्वोत्तम कार्यालय उत्पादकता उपकरण
आउटलुक के लिए कुटूल - आपके आउटलुक को सुपरचार्ज करने के लिए 100 से अधिक शक्तिशाली सुविधाएँ
🤖 एआई मेल सहायक: एआई जादू के साथ त्वरित प्रो ईमेल - प्रतिभाशाली उत्तरों के लिए एक-क्लिक, सही टोन, बहुभाषी महारत। ईमेलिंग को सहजता से रूपांतरित करें! ...
📧 ईमेल स्वचालन: कार्यालय से बाहर (POP और IMAP के लिए उपलब्ध) / ईमेल भेजने का शेड्यूल करें / ईमेल भेजते समय नियमों के अनुसार ऑटो सीसी/बीसीसी / स्वतः अग्रेषित (उन्नत नियम) / स्वतः ग्रीटिंग जोड़ें / बहु-प्राप्तकर्ता ईमेल को स्वचालित रूप से अलग-अलग संदेशों में विभाजित करें ...
📨 ईमेल प्रबंधन: आसानी से ईमेल याद रखें / विषयों और अन्य लोगों द्वारा घोटाले वाले ईमेल को ब्लॉक करें / डुप्लिकेट ईमेल हटाएँ / उन्नत खोज / फ़ोल्डरों को समेकित करें ...
📁 अनुलग्नक प्रो: बैच सहेजें / बैच अलग करना / बैच संपीड़न / ऑटो सहेजें / ऑटो डिटैच / ऑटो कंप्रेस ...
🌟 इंटरफ़ेस जादू: 😊अधिक सुंदर और शानदार इमोजी / टैब्ड व्यू के साथ अपनी आउटलुक उत्पादकता बढ़ाएँ / आउटलुक को बंद करने के बजाय छोटा करें ...
???? एक-क्लिक चमत्कार: आने वाले अनुलग्नकों के साथ सभी को उत्तर दें / फ़िशिंग-रोधी ईमेल / 🕘प्रेषक का समय क्षेत्र दिखाएं ...
👩🏼🤝👩🏻 संपर्क एवं कैलेंडर: बैच चयनित ईमेल से संपर्क जोड़ें / किसी संपर्क समूह को अलग-अलग समूहों में विभाजित करें / जन्मदिन अनुस्मारक हटाएँ ...
के ऊपर 100 सुविधाएँ आपके अन्वेषण की प्रतीक्षा करें! अधिक जानने के लिए यहां क्लिक करें।

