आउटलुक में आपके द्वारा भेजे गए सभी ईमेल को स्वचालित रूप से बीसीसी कैसे करें?
जब आप एक ईमेल संदेश भेज रहे हैं और आपके पास एक स्थायी गुप्त प्राप्तकर्ता है, लेकिन आप नहीं चाहते कि अन्य प्राप्तकर्ता उसका पता देखें, तो आपको बीसीसी फ़ंक्शन का उपयोग करना चाहिए। लेकिन जब हमें गुप्त प्रतिलिपि की आवश्यकता होती है, तो हमें गुप्त प्रतिलिपि फ़ील्ड को मैन्युअल रूप से दिखाना होगा और इसके लिए एक संपर्क का चयन करना होगा। इन मैन्युअल परिचालनों से बचने के लिए, निम्नलिखित लेख आपको दिखाएगा कि आपके द्वारा भेजे जाने वाले सभी ईमेल पर ईमेल पते को स्वचालित रूप से गुप्त रखने के लिए आउटलुक को कैसे संशोधित किया जाए।
- वीबीए का उपयोग करके आउटलुक में डिफ़ॉल्ट ऑटो बीसीसी
- आउटलुक के लिए कुटूल का उपयोग करके आउटलुक में ऑटो बीसीसी
वीबीए का उपयोग करके आउटलुक में डिफ़ॉल्ट ऑटो बीसीसी
आउटलुक में ऑटो बीसीसी नियम को कॉन्फ़िगर करने के लिए आप नीचे दिए गए वीबीए कोड को लागू कर सकते हैं। कृपया इस प्रकार करें:
1। दबाएं ऑल्ट + F11 एप्लिकेशन विंडो के लिए Microsoft Visual Basic खोलने के लिए कुंजियाँ एक साथ।
2. डबल क्लिक करें यह आउटलुक सत्रप्रोजेक्ट फलक में, और फिर शुरुआती विंडो में नीचे VBA कोड चिपकाएँ। नीचे स्क्रीनशॉट देखें:
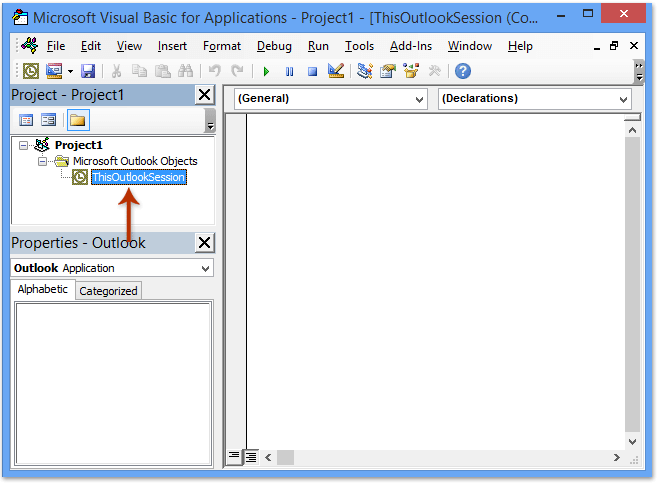
वीबीए कोड: सभी ईमेल भेजते समय ऑटो बीसीसी
Private Sub Application_ItemSend(ByVal Item As Object, Cancel As Boolean)
Dim objRecip As Recipient
Dim strMsg As String
Dim res As Integer
Dim strBcc As String
On Error Resume Next
' #### USER OPTIONS ####
' address for Bcc -- must be SMTP address or resolvable
' to a name in the address book
strBcc = ""
Set objRecip = Item.Recipients.Add(strBcc)
objRecip.Type = olBCC
If Not objRecip.Resolve Then
strMsg = "Could not resolve the Bcc recipient. " & _
"Do you want still to send the message?"
res = MsgBox(strMsg, vbYesNo + vbDefaultButton1, _
"Could Not Resolve Bcc Recipient")
If res = vbNo Then
Cancel = True
End If
End If
Set objRecip = Nothing
End Sub
नोट: कृपया प्रतिस्थापित करें "" उपरोक्त कोड में उस ईमेल पते के साथ जिसकी आप गुप्त प्रतिलिपि बनाएंगे।
3. VBA कोड सहेजें और एप्लिकेशन विंडो के लिए Microsoft Visual Basic बंद करें।
अब से, आपको Bcc फ़ील्ड में पता भरने की ज़रूरत नहीं है। जब आप अपने आउटलुक से ईमेल भेजते हैं, तो यह स्वचालित रूप से आपके वांछित प्राप्तकर्ता को बीसीसी कर देगा क्योंकि वीबीए कोड चल रहा है।
आउटलुक के लिए कुटूल का उपयोग करके आउटलुक में ऑटो बीसीसी
उपरोक्त वीबीए कोड हम शुरुआती लोगों के लिए कुछ कठिन और परेशानी भरा है, यहां एक आसान और त्वरित टूल है - कुटूल्स आउटलुक के लिए आउटलुक में आपके द्वारा भेजे गए सभी ईमेल या निर्दिष्ट ईमेल को स्वचालित रूप से बीसीसी करने में आपकी सहायता के लिए।
आउटलुक के लिए कुटूल: 100 से अधिक उपयोगी टूल के साथ अल्टीमेट आउटलुक टूलकिट। इसे 60 दिनों तक निःशुल्क आज़माएँ, कोई सीमा नहीं, कोई चिंता नहीं! अधिक पढ़ें... अभी नि:शुल्क परीक्षण शुरू करें!
आउटलुक के लिए कुटूल स्थापित करने के बाद, कृपया निम्नानुसार कार्य करें:
1। क्लिक करें कुटूल > ऑटो सीसी/बीसीसी > नियम प्रबंधक, स्क्रीनशॉट देखें:

2. में ऑटो सीसी/बीसीसी प्रबंधक संवाद बॉक्स पर क्लिक करें नया बटन.
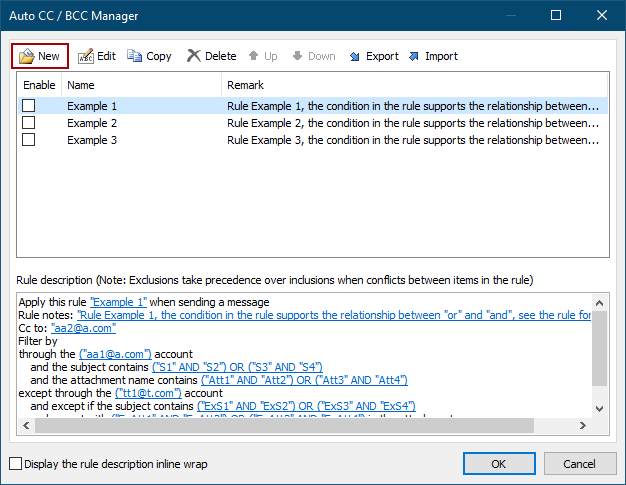
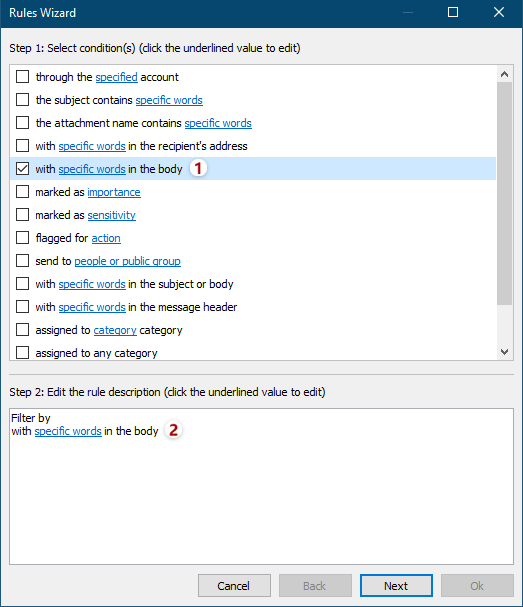
3. नियम विज़ार्ड में, वे शर्तें निर्दिष्ट करें जिनके अनुसार आप ईमेल फ़िल्टर करेंगे। मेरे मामले में, मैं टिक करता हूँ शरीर में विशिष्ट शब्दों के साथ विकल्प, और फिर रेखांकित पाठ पर क्लिक करें विशिष्ट शब्द इसे संपादित करने के लिए।
4. टेक्स्ट सम्मिलित संवाद में, क्लिक करें नया नए शब्द जोड़ने के लिए बटन।
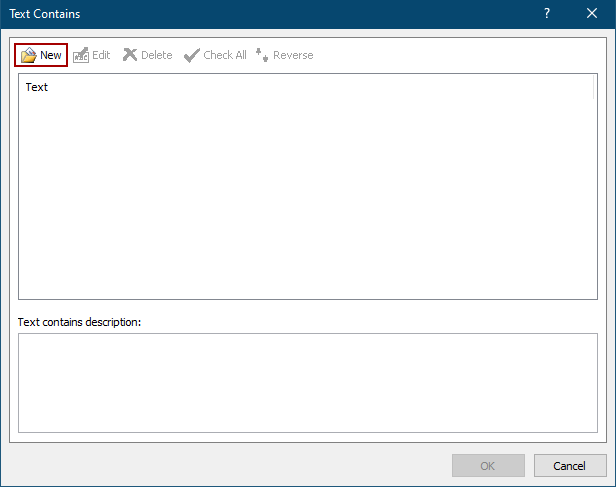
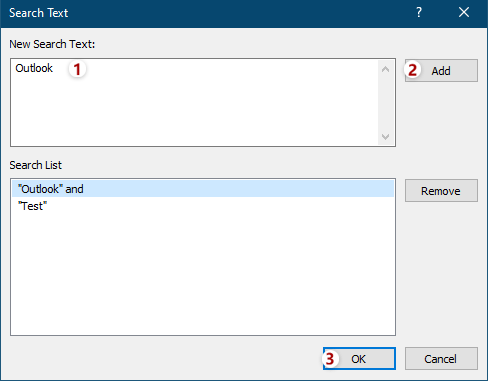
5. टेक्स्ट खोजें संवाद में, एक शब्द टाइप करें नया खोज पाठ बॉक्स, क्लिक करें बटन क्लिक करें, और उसके बाद क्लिक करें OK बटन.
टिप्स: एक ही समय में कई शब्द जोड़ने के लिए, आपको इसमें एक शब्द टाइप करना होगा नया खोज पाठ बॉक्स और क्लिक करें बटन, फिर एक-एक करके अन्य शब्द जोड़ने के लिए इस ऑपरेशन को दोहराएं, और अंत में क्लिक करें OK बटन.
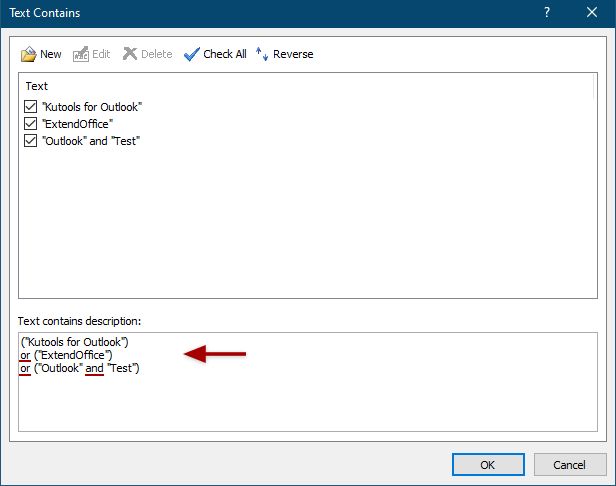
6. अब यह टेक्स्ट कंटेन्स डायलॉग पर वापस जाता है। यदि आवश्यक हो, तो आप क्लिक करने के लिए आगे बढ़ सकते हैं नया अपनी आवश्यकतानुसार अन्य शब्द जोड़ने के लिए बटन दबाएं और फिर इन शब्दों को सहेजने के लिए ओके बटन पर क्लिक करें।
युक्तियाँ: यदि आप एक ही खोज टेक्स्ट बॉक्स में एक साथ कई शब्द जोड़ते हैं, तो इन शब्दों के बीच संबंध है "और"। यदि आप क्लिक करके अनेक शब्द जोड़ते हैं नया क्रमिक रूप से बटन, इन शब्दों के बीच का संबंध है "OR".
7. फिर यह नियम विज़ार्ड पर लौटता है, अपनी आवश्यकतानुसार अन्य शर्तें निर्दिष्ट करें और क्लिक करें अगला बटन.
8. दूसरे नियम विज़ार्ड में, अपवाद निर्दिष्ट करें या अपनी आवश्यकतानुसार किसी भी अपवाद की जाँच न करें, और क्लिक करें अगला बटन.
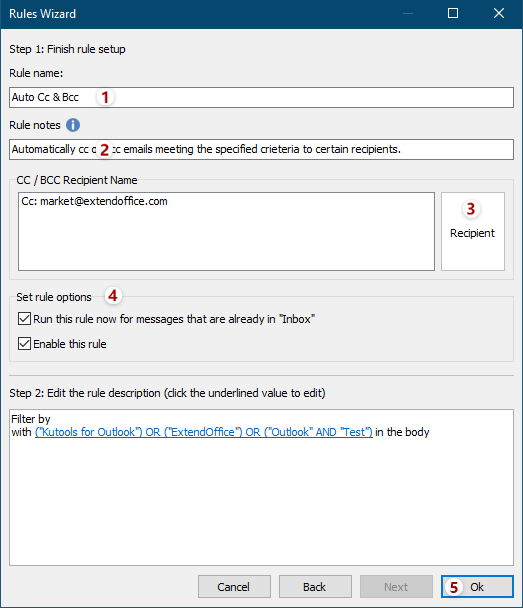
9. तीसरे नियम विज़ार्ड में, कृपया इस नए गुप्त प्रतिलिपि नियम के लिए एक नाम टाइप करें नियम का नाम बॉक्स में, नियम के लिए विवरण दर्ज करें नियम नोट्स बॉक्स, क्लिक करें प्राप्त करने वाला Cc या Bcc प्राप्तकर्ताओं को जोड़ने के लिए बटन, चल रहे विकल्पों पर टिक करें नियम विकल्प सेट करें अनुभाग पर क्लिक करें, और क्लिक करें OK बटन.
10. ऑटो सीसी/बीसीसी मैनेजर में, सुनिश्चित करें कि नया सीसी/बीसीसी नियम चेक किया गया है, और डायलॉग बंद करने के लिए ओके बटन को कॉक करें।
11. नियम को सक्षम करने के लिए आउटलुक मुख्य इंटरफ़ेस में Kutools > CC/BCC > Enable Auto CC/BCC पर क्लिक करने के लिए आगे बढ़ें।

और क्लिक करें OK पॉपिंग आउट पुन: पुष्टिकरण संवाद में बटन।
अभी तक जो बीसीसी नियम बनाया गया है, उसमें जब आप ईमेल भेजेंगे तो उसी समय बीसीसी प्राप्तकर्ता को वही संदेश भेजा जाएगा।
नोट्स:
(1) इस फ़ंक्शन के साथ, आप हमेशा सेट कर सकते हैं CC नियम भी.
(2) आप इस टूल का उपयोग करके अपनी आवश्यकता के अनुसार कई नियम बना सकते हैं।
(3) यदि आप नियम बंद करना चाहते हैं तो क्लिक कर सकते हैं ऑटो सीसी/बीसीसी सक्षम करें, और सभी नियम काम नहीं करेंगे। इसके अलावा आप इसमें नियमों के नाम को अनचेक भी कर सकते हैं ऑटो सीसी/बीसीसी प्रबंधक कुछ निर्दिष्ट नियमों को अक्षम करने के लिए संवाद बॉक्स।
संबंधित लेख:
आउटलुक में हमेशा स्वयं को स्वचालित रूप से सीसी कैसे करें?
सर्वोत्तम कार्यालय उत्पादकता उपकरण
आउटलुक के लिए कुटूल - आपके आउटलुक को सुपरचार्ज करने के लिए 100 से अधिक शक्तिशाली सुविधाएँ
🤖 एआई मेल सहायक: एआई जादू के साथ त्वरित प्रो ईमेल - प्रतिभाशाली उत्तरों के लिए एक-क्लिक, सही टोन, बहुभाषी महारत। ईमेलिंग को सहजता से रूपांतरित करें! ...
📧 ईमेल स्वचालन: कार्यालय से बाहर (POP और IMAP के लिए उपलब्ध) / ईमेल भेजने का शेड्यूल करें / ईमेल भेजते समय नियमों के अनुसार ऑटो सीसी/बीसीसी / स्वतः अग्रेषित (उन्नत नियम) / स्वतः ग्रीटिंग जोड़ें / बहु-प्राप्तकर्ता ईमेल को स्वचालित रूप से अलग-अलग संदेशों में विभाजित करें ...
📨 ईमेल प्रबंधन: आसानी से ईमेल याद रखें / विषयों और अन्य लोगों द्वारा घोटाले वाले ईमेल को ब्लॉक करें / डुप्लिकेट ईमेल हटाएँ / उन्नत खोज / फ़ोल्डरों को समेकित करें ...
📁 अनुलग्नक प्रो: बैच सहेजें / बैच अलग करना / बैच संपीड़न / ऑटो सहेजें / ऑटो डिटैच / ऑटो कंप्रेस ...
🌟 इंटरफ़ेस जादू: 😊अधिक सुंदर और शानदार इमोजी / टैब्ड व्यू के साथ अपनी आउटलुक उत्पादकता बढ़ाएँ / आउटलुक को बंद करने के बजाय छोटा करें ...
???? एक-क्लिक चमत्कार: आने वाले अनुलग्नकों के साथ सभी को उत्तर दें / फ़िशिंग-रोधी ईमेल / 🕘प्रेषक का समय क्षेत्र दिखाएं ...
👩🏼🤝👩🏻 संपर्क एवं कैलेंडर: बैच चयनित ईमेल से संपर्क जोड़ें / किसी संपर्क समूह को अलग-अलग समूहों में विभाजित करें / जन्मदिन अनुस्मारक हटाएँ ...
के ऊपर 100 सुविधाएँ आपके अन्वेषण की प्रतीक्षा करें! अधिक जानने के लिए यहां क्लिक करें।

