मुख्य सामग्री पर जाएं

आउटलुक में गुप्त प्रतिलिपि के साथ मीटिंग आमंत्रण कैसे भेजें?

लेखक: केली अंतिम संशोधित: 2020-05-20

आम तौर पर, आप आउटलुक में दर्ज गुप्त प्रतिलिपि में प्राप्तकर्ताओं के ईमेल पते टाइप करके आसानी से प्राप्तकर्ताओं को एक ईमेल बीसीसी (ब्लाइंड कार्बन कॉपी) कर सकते हैं। हालाँकि, जब हम मीटिंग आमंत्रण भेजते हैं तो मीटिंग विंडो में कोई गुप्त प्रतिलिपि दर्ज नहीं की जाती है। वास्तव में हम आउटलुक में रिसोर्स अटेंडीज़ को जोड़कर बीसीसी के साथ मीटिंग निमंत्रण भेज सकते हैं।


Microsoft Outlook में Bcc के साथ मीटिंग आमंत्रण भेजने के लिए, आप निम्न कार्य कर सकते हैं:

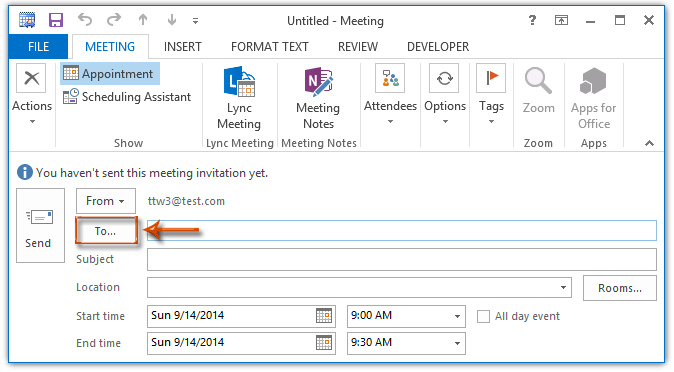
1. कैलेंडर दृश्य पर जाएँ, और एक नया मीटिंग आमंत्रण बनाएँ:

  1. आउटलुक 2010 और 2013 में, क्लिक करें नई बैठक पर बटन होम टैब;
  2. आउटलुक 2007 में, क्लिक करें पट्टिका > नया > बैठक अनुरोध.

2. मीटिंग विंडो में, क्लिक करें सेवा मेरे बटन.

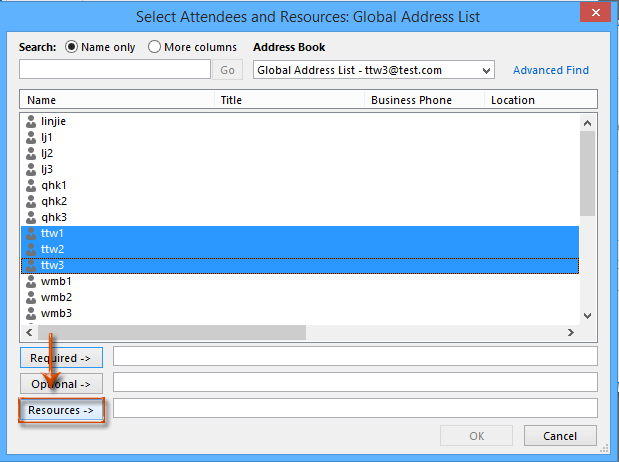
3. पॉप अप होने वाले सहभागियों और संसाधनों का चयन करें संवाद बॉक्स में, उन उपस्थित लोगों का पता लगाएं और उनका चयन करें जिन्हें आप मीटिंग में शामिल करेंगे, फिर क्लिक करें संसाधन -> बटन, अंत में क्लिक करें OK बटन। स्क्रीन शॉट देखें:

टिप्पणियाँ:
(1) धारण करना पाली कुंजी, आप पहले और अंतिम पर क्लिक करके एकाधिक आसन्न उपस्थितियों का चयन कर सकते हैं;
(2) धारण करना कंट्रोल कुंजी, आप प्रत्येक सहभागी पर एक-एक करके क्लिक करके कई गैर-आसन्न सहभागियों का चयन कर सकते हैं।

4. अब आप मीटिंग विंडो पर वापस आएं, अपनी मीटिंग लिखें और क्लिक करें भेजें बटन.

नोट: यदि आपको बैठक में उपस्थित लोगों को सीसी (कार्बन कॉपी) देने की आवश्यकता है, तो बस उपस्थित लोगों को इसमें जोड़ें ऐच्छिक उपस्थितगण और संसाधन का चयन करें संवाद बॉक्स में दायर किया गया। ऊपर स्क्रीनशॉट देखें.


सर्वोत्तम कार्यालय उत्पादकता उपकरण

आउटलुक के लिए कुटूल - आपके आउटलुक को सुपरचार्ज करने के लिए 100 से अधिक शक्तिशाली सुविधाएँ

🤖 एआई मेल सहायक: एआई जादू के साथ त्वरित प्रो ईमेल - प्रतिभाशाली उत्तरों के लिए एक-क्लिक, सही टोन, बहुभाषी महारत। ईमेलिंग को सहजता से रूपांतरित करें! ...

📧 ईमेल स्वचालन: कार्यालय से बाहर (POP और IMAP के लिए उपलब्ध)  /  ईमेल भेजने का शेड्यूल करें  /  ईमेल भेजते समय नियमों के अनुसार ऑटो सीसी/बीसीसी  /  स्वतः अग्रेषित (उन्नत नियम)   /  स्वतः ग्रीटिंग जोड़ें   /  बहु-प्राप्तकर्ता ईमेल को स्वचालित रूप से अलग-अलग संदेशों में विभाजित करें ...

📨 ईमेल प्रबंधन: आसानी से ईमेल याद रखें  /  विषयों और अन्य लोगों द्वारा घोटाले वाले ईमेल को ब्लॉक करें  /  डुप्लिकेट ईमेल हटाएँ  /  उन्नत खोज  /  फ़ोल्डरों को समेकित करें ...

📁 अनुलग्नक प्रोबैच सहेजें  /  बैच अलग करना  /  बैच संपीड़न  /  ऑटो सहेजें   /  ऑटो डिटैच  /  ऑटो कंप्रेस ...

🌟 इंटरफ़ेस जादू: 😊अधिक सुंदर और शानदार इमोजी   /  टैब्ड व्यू के साथ अपनी आउटलुक उत्पादकता बढ़ाएँ  /  आउटलुक को बंद करने के बजाय छोटा करें ...

???? एक-क्लिक चमत्कार: आने वाले अनुलग्नकों के साथ सभी को उत्तर दें  /   फ़िशिंग-रोधी ईमेल  /  🕘प्रेषक का समय क्षेत्र दिखाएं ...

👩🏼‍🤝‍👩🏻 संपर्क एवं कैलेंडर: बैच चयनित ईमेल से संपर्क जोड़ें  /  किसी संपर्क समूह को अलग-अलग समूहों में विभाजित करें  /  जन्मदिन अनुस्मारक हटाएँ ...

के ऊपर 100 सुविधाएँ आपके अन्वेषण की प्रतीक्षा करें! अधिक जानने के लिए यहां क्लिक करें।


Comments (33)
No ratings yet. Be the first to rate!
This comment was minimized by the moderator on the site
This does not work. Recipients see each others names / details in the 'location' now, so does not solve the issue.
This comment was minimized by the moderator on the site
In new Outlook Desktop App, create new meeting -> scheduling assistant -> add resources (NOT required or optional attendees). The attendees will still receive RSVPs, but will not see who else is invited.
This comment was minimized by the moderator on the site
Too bad they again haven't thought of common everyday things when designing their software.
I need to invite several people who signed up for a vaccine, I do not think it's proper to make publicly known who signed up.
My only alternative is to create an invite per person.
This comment was minimized by the moderator on the site
David #39688
do it in online version of Outlook, in New meeting select Response options and use checkbox Hide attendee list.
it works only online, in your installed app this version isnt accesible - you know Microsoft...

Hi there,

You can try the above advice from David. 🙂

Amanda
This comment was minimized by the moderator on the site
This is not a proper hack.

Still invitees appear in other section.
This comment was minimized by the moderator on the site
do it in online version of Outlook, in New meeting select Response options and use checkbox Hide attendee list.
it works only online, in your installed app this version isnt accesible - you know Microsoft...
This comment was minimized by the moderator on the site
Hi
How can we do this with the "new outlook" please
I am able to manage it
Thank you!
Brenda
This comment was minimized by the moderator on the site
Hi there,

For newer versions, the To... button is replaced with Required and Optional. Click either one as you need and then add recipients in the Resources box.

Amanda
This comment was minimized by the moderator on the site
Problem tylko jest taki, że gdy ktoś prześle dalej to spotkanie z poziomu Outlooka to Outlook zacytuje nagłówek oryginalnego zaproszenia, a z nagłówka zaproszenia odczytasz wszystkie adresy zaproszonych. Nie działa. Jedyna opcja jaką znam, to wysłanie zaproszenia ze strony outlook.com Opcje odpowiedzi > Ukryj listę uczestników
This comment was minimized by the moderator on the site
When sending a meeting BCC like stated here, can attendees see each other in the "Tracking" tab of the meeting?
This comment was minimized by the moderator on the site
When I select Resources with email I plan for BCC, it turned to be Location change instead of BCC, does anyone know why? Thanks
This comment was minimized by the moderator on the site
Mine did this too, but I just said not to update the location and proceeded from there. Worked.
This comment was minimized by the moderator on the site
so in 2010 and 2013... i understand that you click on the word "required" and make sure names are in "resources".. then the evite goes as a bcc .. how do you turn off responses?
There are no comments posted here yet
Load More
Please leave your comments in English
Posting as Guest
×
Rate this post:
0   Characters
Suggested Locations