एक्सेल में मासिक/वार्षिक कैलेंडर कैसे बनाएं?
कुछ समय में आपको Excel में एक विशिष्ट माह या वर्ष का कैलेंडर बनाने की आवश्यकता होती है, आप इसे शीघ्रता से कैसे हल कर सकते हैं? यह ट्यूटोरियल एक्सेल में त्वरित रूप से मासिक या वार्षिक कैलेंडर बनाने की तरकीबें पेश करता है।
एक्सेल टेम्पलेट द्वारा मासिक या वार्षिक कैलेंडर बनाएं
VBA द्वारा मासिक कैलेंडर बनाएं
सतत कैलेंडर द्वारा आसानी से मासिक या वार्षिक कैलेंडर बनाएं ![]()
 एक्सेल टेम्पलेट द्वारा मासिक या वार्षिक कैलेंडर बनाएं

एक्सेल में, आप मासिक या वार्षिक कैलेंडर बनाने के लिए कैलेंडर टेम्पलेट का उपयोग कर सकते हैं।
1. Excel 2010/2013 में, क्लिक करें पट्टिका > नया, एक्सेल 2007 में, क्लिक करें कार्यालय बटन > नया, फिर पॉपिंग विंडो के दाहिने भाग में टाइप करें कैलेंडर खोज इंजन में. स्क्रीनशॉट देखें:
एक्सेल 2010/2013 में
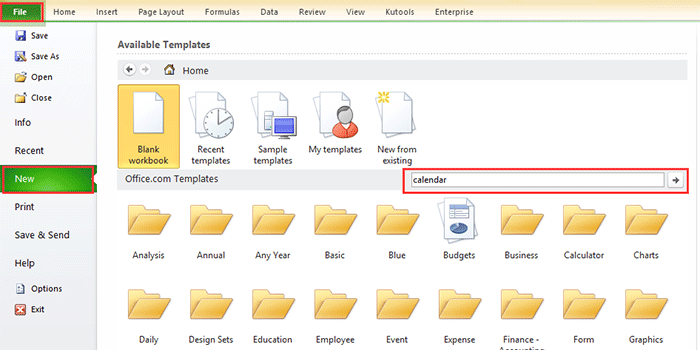
एक्सेल 2007 में

2। दबाएँ दर्ज, तो विंडो में कई प्रकार के कैलेंडर सूचीबद्ध हैं। आपको जिस प्रकार के कैलेंडर की आवश्यकता है उसे चुनें और क्लिक करें डाउनलोड करें (या बनाएं) दाएँ फलक में. स्क्रीनशॉट देखें:

अब एक नई कार्यपुस्तिका में एक कैलेंडर बनाया जाता है। स्क्रीनशॉट देखें:

VBA द्वारा मासिक कैलेंडर बनाएं
कभी-कभी, आपको निर्दिष्ट महीने के लिए एक महीने का कैलेंडर बनाने की आवश्यकता होती है, जैसे कि जनवरी 2015। उपरोक्त विधि से ऐसा कैलेंडर टेम्पलेट ढूंढना थोड़ा कठिन हो सकता है। यहां मैं एक विशिष्ट मासिक कैलेंडर बनाने में आपकी सहायता के लिए एक वीबीए कोड प्रस्तुत करता हूं।
1। दबाएँ ऑल्ट + F11 खोलने के लिए चाबी अनुप्रयोगों के लिए माइक्रोसॉफ्ट विज़ुअल बेसिक खिड़की, क्लिक करें सम्मिलित करें > मॉड्यूल, फिर नीचे दिए गए VBA कोड को कॉपी करके विंडो पर पेस्ट करें।
वीबीए: मासिक कैलेंडर बनाएं।
Sub CalendarMaker()

       ' Unprotect sheet if had previous calendar to prevent error.
       ActiveSheet.Protect DrawingObjects:=False, Contents:=False, _
          Scenarios:=False
       ' Prevent screen flashing while drawing calendar.
       Application.ScreenUpdating = False
       ' Set up error trapping.
       On Error GoTo MyErrorTrap
       ' Clear area a1:g14 including any previous calendar.
       Range("a1:g14").Clear
       ' Use InputBox to get desired month and year and set variable
       ' MyInput.
       MyInput = InputBox("Type in Month and year for Calendar ")
       ' Allow user to end macro with Cancel in InputBox.
       If MyInput = "" Then Exit Sub
       ' Get the date value of the beginning of inputted month.
       StartDay = DateValue(MyInput)
       ' Check if valid date but not the first of the month
       ' -- if so, reset StartDay to first day of month.
       If Day(StartDay) <> 1 Then
           StartDay = DateValue(Month(StartDay) & "/1/" & _
               Year(StartDay))
       End If
       ' Prepare cell for Month and Year as fully spelled out.
       Range("a1").NumberFormat = "mmmm yyyy"
       ' Center the Month and Year label across a1:g1 with appropriate
       ' size, height and bolding.
       With Range("a1:g1")
           .HorizontalAlignment = xlCenterAcrossSelection
           .VerticalAlignment = xlCenter
           .Font.Size = 18
           .Font.Bold = True
           .RowHeight = 35
       End With
       ' Prepare a2:g2 for day of week labels with centering, size,
       ' height and bolding.
       With Range("a2:g2")
           .ColumnWidth = 11
           .VerticalAlignment = xlCenter
           .HorizontalAlignment = xlCenter
           .VerticalAlignment = xlCenter
           .Orientation = xlHorizontal
           .Font.Size = 12
           .Font.Bold = True
           .RowHeight = 20
       End With
       ' Put days of week in a2:g2.
       Range("a2") = "Sunday"
       Range("b2") = "Monday"
       Range("c2") = "Tuesday"
       Range("d2") = "Wednesday"
       Range("e2") = "Thursday"
       Range("f2") = "Friday"
       Range("g2") = "Saturday"
       ' Prepare a3:g7 for dates with left/top alignment, size, height
       ' and bolding.
       With Range("a3:g8")
           .HorizontalAlignment = xlRight
           .VerticalAlignment = xlTop
           .Font.Size = 18
           .Font.Bold = True
           .RowHeight = 21
       End With
       ' Put inputted month and year fully spelling out into "a1".
       Range("a1").Value = Application.Text(MyInput, "mmmm yyyy")
       ' Set variable and get which day of the week the month starts.
       DayofWeek = WeekDay(StartDay)
       ' Set variables to identify the year and month as separate
       ' variables.
       CurYear = Year(StartDay)
       CurMonth = Month(StartDay)
       ' Set variable and calculate the first day of the next month.
       FinalDay = DateSerial(CurYear, CurMonth + 1, 1)
       ' Place a "1" in cell position of the first day of the chosen
       ' month based on DayofWeek.
       Select Case DayofWeek
           Case 1
               Range("a3").Value = 1
           Case 2
               Range("b3").Value = 1
           Case 3
               Range("c3").Value = 1
           Case 4
               Range("d3").Value = 1
           Case 5
               Range("e3").Value = 1
           Case 6
               Range("f3").Value = 1
           Case 7
               Range("g3").Value = 1
       End Select
       ' Loop through range a3:g8 incrementing each cell after the "1"
       ' cell.
       For Each cell In Range("a3:g8")
           RowCell = cell.Row
           ColCell = cell.Column
           ' Do if "1" is in first column.
           If cell.Column = 1 And cell.Row = 3 Then
           ' Do if current cell is not in 1st column.
           ElseIf cell.Column <> 1 Then
               If cell.Offset(0, -1).Value >= 1 Then
                   cell.Value = cell.Offset(0, -1).Value + 1
                   ' Stop when the last day of the month has been
                   ' entered.
                   If cell.Value > (FinalDay - StartDay) Then
                       cell.Value = ""
                       ' Exit loop when calendar has correct number of
                       ' days shown.
                       Exit For
                   End If
               End If
           ' Do only if current cell is not in Row 3 and is in Column 1.
           ElseIf cell.Row > 3 And cell.Column = 1 Then
               cell.Value = cell.Offset(-1, 6).Value + 1
               ' Stop when the last day of the month has been entered.
               If cell.Value > (FinalDay - StartDay) Then
                   cell.Value = ""
                   ' Exit loop when calendar has correct number of days
                   ' shown.
                   Exit For
               End If
           End If
       Next

       ' Create Entry cells, format them centered, wrap text, and border
       ' around days.
       For x = 0 To 5
           Range("A4").Offset(x * 2, 0).EntireRow.Insert
           With Range("A4:G4").Offset(x * 2, 0)
               .RowHeight = 65
               .HorizontalAlignment = xlCenter
               .VerticalAlignment = xlTop
               .WrapText = True
               .Font.Size = 10
               .Font.Bold = False
               ' Unlock these cells to be able to enter text later after
               ' sheet is protected.
               .Locked = False
           End With
           ' Put border around the block of dates.
           With Range("A3").Offset(x * 2, 0).Resize(2, _
           7).Borders(xlLeft)
               .Weight = xlThick
               .ColorIndex = xlAutomatic
           End With

           With Range("A3").Offset(x * 2, 0).Resize(2, _
           7).Borders(xlRight)
               .Weight = xlThick
               .ColorIndex = xlAutomatic
           End With
           Range("A3").Offset(x * 2, 0).Resize(2, 7).BorderAround _
              Weight:=xlThick, ColorIndex:=xlAutomatic
       Next
       If Range("A13").Value = "" Then Range("A13").Offset(0, 0) _
          .Resize(2, 8).EntireRow.Delete
       ' Turn off gridlines.
       ActiveWindow.DisplayGridlines = False
       ' Protect sheet to prevent overwriting the dates.
       ActiveSheet.Protect DrawingObjects:=True, Contents:=True, _
          Scenarios:=True

       ' Resize window to show all of calendar (may have to be adjusted
       ' for video configuration).
       ActiveWindow.WindowState = xlMaximized
       ActiveWindow.ScrollRow = 1

       ' Allow screen to redraw with calendar showing.
       Application.ScreenUpdating = True
       ' Prevent going to error trap unless error found by exiting Sub
       ' here.
       Exit Sub
   ' Error causes msgbox to indicate the problem, provides new input box,
   ' and resumes at the line that caused the error.
   MyErrorTrap:
       MsgBox "You may not have entered your Month and Year correctly." _
           & Chr(13) & "Spell the Month correctly" _
           & " (or use 3 letter abbreviation)" _
           & Chr(13) & "and 4 digits for the Year"
       MyInput = InputBox("Type in Month and year for Calendar")
       If MyInput = "" Then Exit Sub
       Resume
   End Sub
VBA इस वेब से आ रहा है https://support.microsoft.com/en-us/kb/150774
2। दबाएँ F5 कुंजी या रन बटन, और आपको यह याद दिलाने के लिए एक संवाद पॉप आउट होता है कि आपको कैलेंडर बनाने के लिए आवश्यक विशिष्ट महीना टाइप करना है, स्क्रीनशॉट देखें:

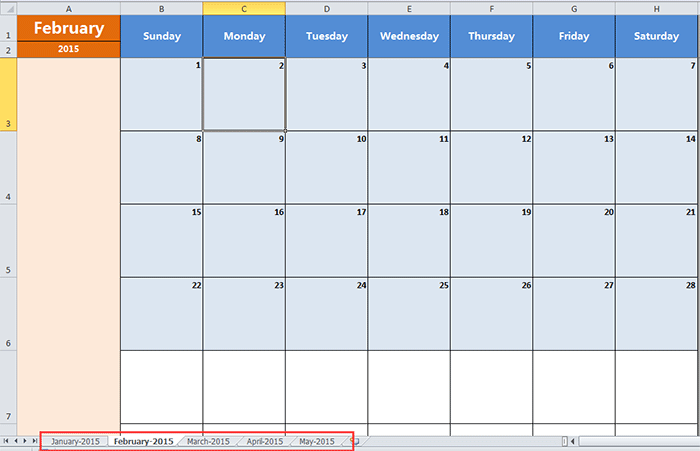
3। क्लिक करें OK. अब सक्रिय शीट में जनवरी 2015 का कैलेंडर बनाया गया है।

लेकिन उपरोक्त विधियों में कुछ सीमाएँ हैं, उदाहरण के लिए, यदि आप जनवरी से मई तक का कैलेंडर एक साथ बनाना चाहते हैं, तो आपको उपरोक्त दो विधियों से पाँच बार में कैलेंडर बनाना होगा। अब मैं इसे जल्दी और आसानी से हल करने के लिए एक उपयोगी उपयोगिता पेश करता हूं
सतत कैलेंडर द्वारा आसानी से मासिक या वार्षिक कैलेंडर बनाएं
सतत कैलेंडर में शक्तिशाली उपयोगिताओं में से एक है एक्सेल के लिए कुटूल, और यह आपको एक्सेल में तुरंत मासिक या वार्षिक कैलेंडर बनाने में मदद कर सकता है।
| एक्सेल के लिए कुटूल, से अधिक के साथ 300 सुविधाजनक कार्य, आपके कार्यों को और अधिक आसान बनाते हैं। | ||
1। क्लिक करें उद्यम > वर्कशीट > सतत कैलेंडर. स्क्रीनशॉट देखें:

2. पॉपिंग डायलॉग में, उस महीने की अवधि निर्दिष्ट करें जिसे आप कैलेंडर बनाना चाहते हैं, और क्लिक करें बनाएं. स्क्रीनशॉट देखें:

फिर पांच कैलेंडर वर्कशीट के साथ एक नई वर्कबुक बनाई जाती है। स्क्रीनशॉट देखें:
सुझाव:
यदि आप केवल एक विशिष्ट महीने का कैलेंडर बनाना चाहते हैं, तो संवाद में प्रेषक और प्रति टेक्स्ट बॉक्स दोनों में एक ही महीने का चयन करना होगा।
सतत कैलेंडर के बारे में अधिक जानने के लिए यहां क्लिक करें
सर्वोत्तम कार्यालय उत्पादकता उपकरण
एक्सेल के लिए कुटूल के साथ अपने एक्सेल कौशल को सुपरचार्ज करें, और पहले जैसी दक्षता का अनुभव करें। एक्सेल के लिए कुटूल उत्पादकता बढ़ाने और समय बचाने के लिए 300 से अधिक उन्नत सुविधाएँ प्रदान करता है। वह सुविधा प्राप्त करने के लिए यहां क्लिक करें जिसकी आपको सबसे अधिक आवश्यकता है...
")
ऑफिस टैब ऑफिस में टैब्ड इंटरफ़ेस लाता है, और आपके काम को बहुत आसान बनाता है
- Word, Excel, PowerPoint में टैब्ड संपादन और रीडिंग सक्षम करें, प्रकाशक, एक्सेस, विसियो और प्रोजेक्ट।
- नई विंडो के बजाय एक ही विंडो के नए टैब में एकाधिक दस्तावेज़ खोलें और बनाएं।
- आपकी उत्पादकता 50% बढ़ जाती है, और आपके लिए हर दिन सैकड़ों माउस क्लिक कम हो जाते हैं!
")